
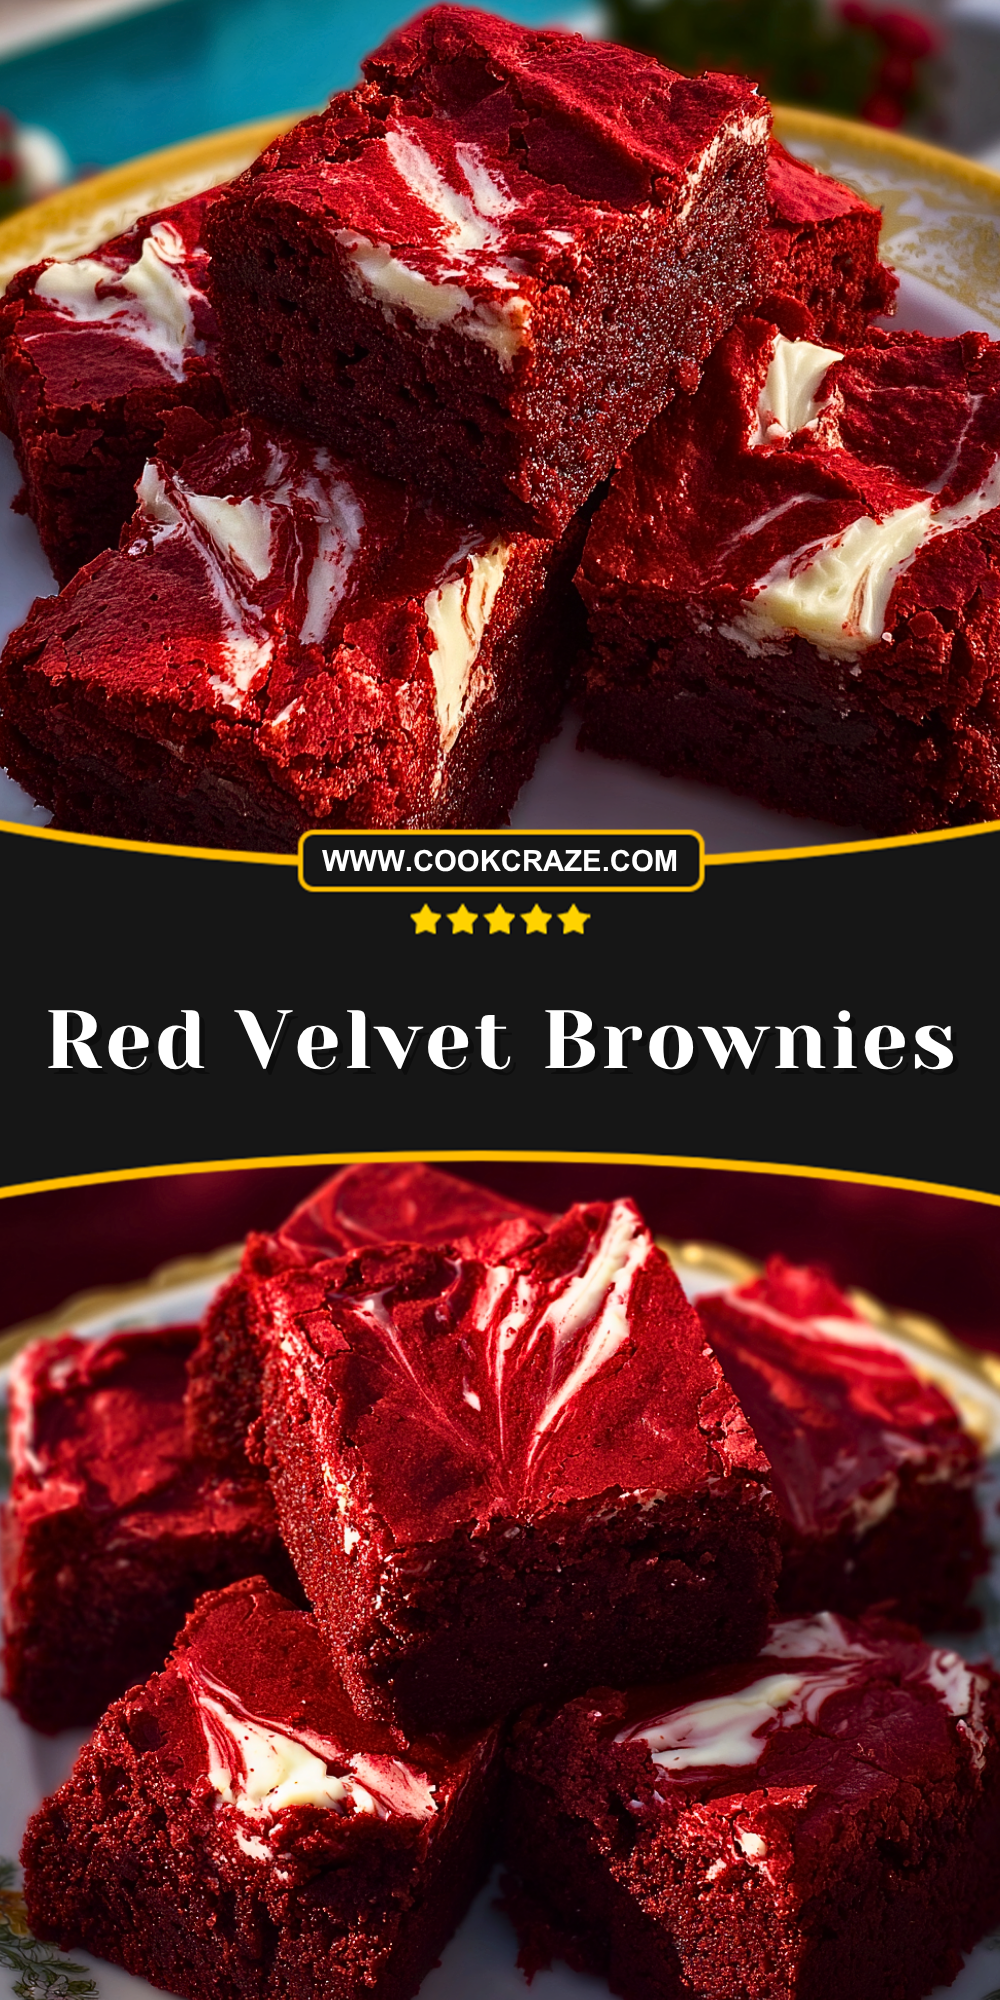
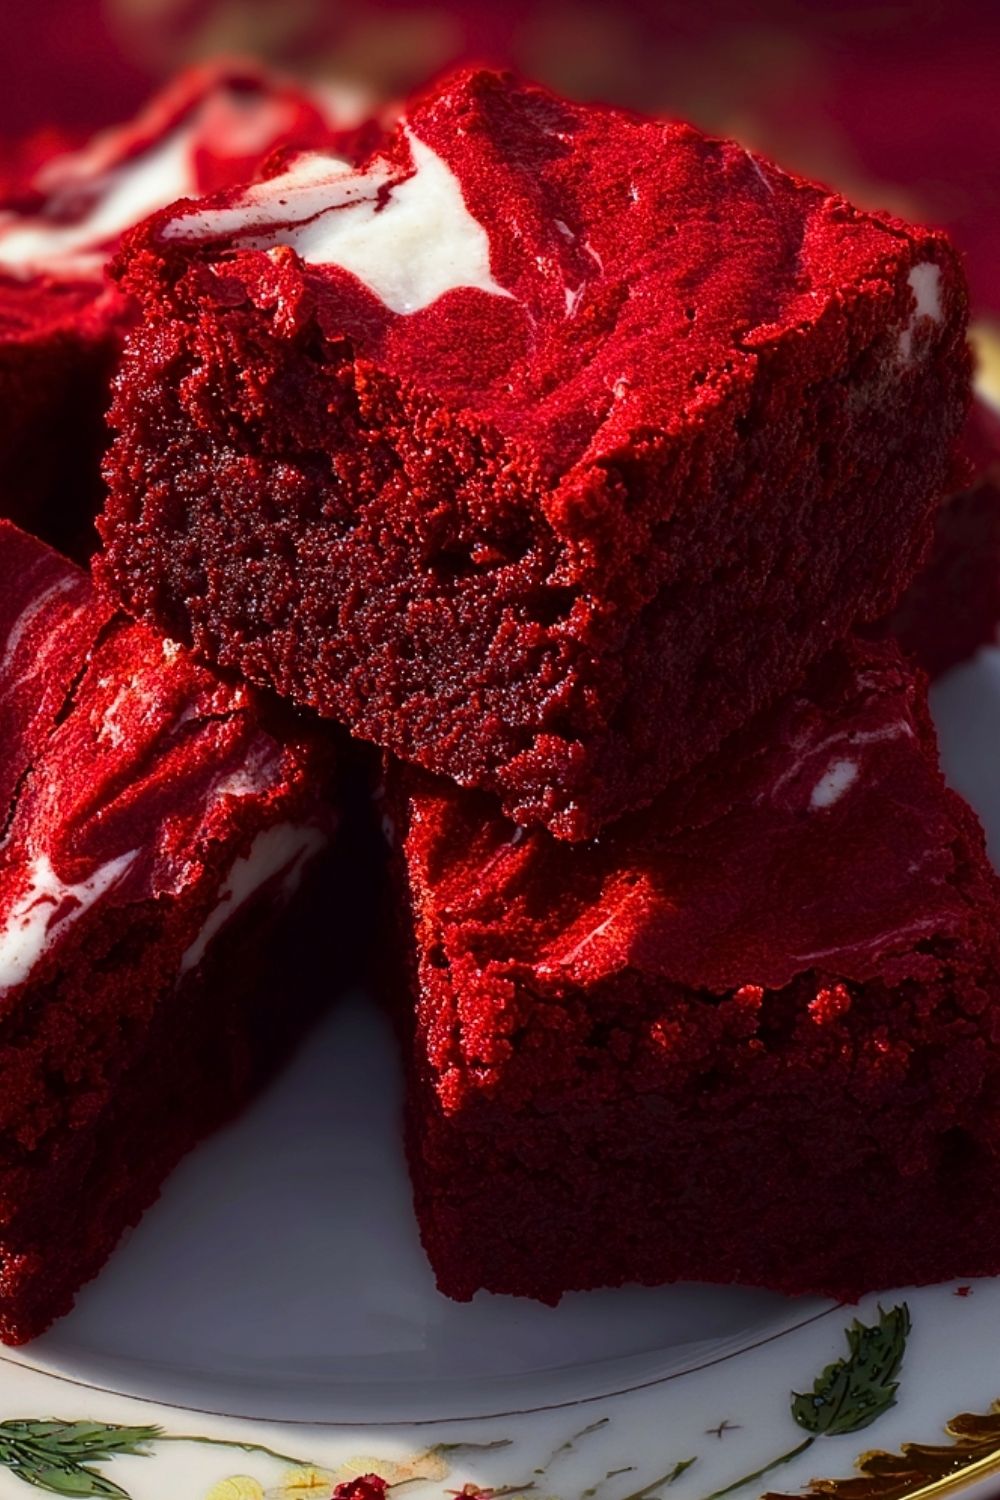
Red velvet brownies bring together everything I love about classic brownies and rich red velvet cake in one irresistible dessert. The first time I baked a batch, I was hooked by the deep cocoa flavor, soft fudgy texture, and beautiful red color that makes them stand out on any dessert table. Every bite feels rich and indulgent, especially with the creamy swirls baked right into the top.
WANT TO SAVE THIS RECIPE?
Just enter your email and get it sent to your inbox!

I also love how easy these brownies are to make without sacrificing flavor or presentation. They look bakery-worthy, yet the process is simple enough for a casual weekend bake. Whether I’m making them for holidays, birthdays, or just because I want something chocolatey and comforting, these brownies always disappear quickly.
Why You’ll Love This Red Velvet Brownies Recipe
These brownies have a perfectly balanced texture that sits somewhere between a chewy brownie and a soft cake. The cocoa flavor is rich without overpowering the signature tangy sweetness that red velvet desserts are known for.
The cream cheese swirl adds a smooth and slightly tangy layer that complements the dense chocolate base beautifully. It also creates that eye-catching marbled top that makes every square look extra special.
Another reason this recipe stands out is how versatile it can be. You can serve these brownies warm with ice cream, package them as edible gifts, or enjoy them straight from the pan with coffee or milk.
What Makes Red Velvet Brownies Different From Regular Brownies?
Red velvet brownies are different because they combine the fudgy texture of brownies with the flavor profile of red velvet cake. Unlike traditional brownies that focus heavily on deep chocolate richness, red velvet brownies have a lighter cocoa flavor paired with subtle vanilla notes and a slight tang from ingredients like cream cheese or vinegar.
The vibrant red color is another signature feature that instantly sets them apart. While classic brownies are dark brown and intensely chocolatey, red velvet brownies offer a softer, more elegant dessert experience that still satisfies chocolate cravings.
Their texture also tends to be slightly more tender and velvety, making them unique compared to dense or ultra-chewy brownie recipes.
Options for Substitutions
If you do not have buttermilk on hand, you can easily make a quick substitute by mixing regular milk with a little lemon juice or vinegar. Let it sit for a few minutes before using it in the batter.
For a deeper chocolate flavor, dark cocoa powder can replace regular cocoa powder. This creates a richer taste while still keeping the classic red velvet appearance.
Cream cheese can be swapped with mascarpone for a smoother and slightly sweeter swirl topping. Greek yogurt also works if you want a lighter option with a mild tang.
If you prefer natural coloring alternatives, beet powder or natural red food coloring can replace traditional food dye while still giving the brownies their signature look.
Gluten-free flour blends can also be used successfully in this recipe. Choose a baking blend designed for one-to-one substitution to maintain the soft, fudgy texture.
Ingredients for This Red Velvet Brownies Recipe
Unsalted Butter
Butter gives these brownies their rich and indulgent texture. It helps create the soft, fudgy center while adding a smooth buttery flavor that balances the cocoa perfectly.
Granulated Sugar
Sugar sweetens the brownies and contributes to the shiny, slightly crackly top layer. It also helps keep the brownies moist after baking.
Eggs
Eggs provide structure and richness. They bind the ingredients together while helping the brownies bake into a soft and chewy texture.
Vanilla Extract
Vanilla enhances the chocolate flavor and adds warmth to the overall taste of the brownies. It also complements the cream cheese swirl beautifully.
Cocoa Powder
Cocoa powder gives the brownies their signature chocolate flavor. Red velvet desserts use less cocoa than classic brownies, creating a lighter chocolate taste with a smooth finish.
Red Food Coloring
The vibrant red color is what makes these brownies instantly recognizable. Food coloring creates the dramatic appearance that gives red velvet desserts their iconic look.
All-Purpose Flour
Flour provides structure to the brownies while still allowing them to remain soft and tender. Using the right amount keeps the texture dense and fudgy instead of cakey.
Salt
Salt balances the sweetness and enhances the cocoa flavor. Even a small amount makes the overall flavor richer and more balanced.
White Vinegar
A little vinegar adds the subtle tang associated with classic red velvet desserts. It also reacts with the cocoa to deepen the flavor profile.
Cream Cheese
Cream cheese creates the creamy swirl on top of the brownies. Its tangy flavor cuts through the sweetness and gives the dessert a smooth, luxurious finish.
Powdered Sugar
Powdered sugar sweetens the cream cheese mixture without making it grainy. It helps create a silky texture for the swirl topping.
Step 1: Prepare the Baking Pan
Start by preheating your oven to 350°F. Line an 8×8-inch baking pan with parchment paper, leaving some overhang on the sides so the brownies can be lifted out easily later.
Greasing the pan lightly underneath the parchment helps keep everything in place while pouring in the batter.
Step 2: Melt the Butter
Place the butter in a microwave-safe bowl or saucepan and melt it gently until smooth. Allow it to cool slightly before mixing with the sugar so the eggs will not scramble later.
Melted butter creates a denser and fudgier brownie texture compared to softened butter.
Step 3: Mix the Wet Ingredients
In a large mixing bowl, whisk together the melted butter and granulated sugar until smooth and glossy. Add the eggs one at a time, whisking thoroughly after each addition.
Stir in the vanilla extract, red food coloring, and vinegar. The mixture should become vibrant red and silky in texture.
Taking the time to whisk thoroughly helps create the shiny brownie top everyone loves.
Step 4: Add the Dry Ingredients
Sift the flour, cocoa powder, and salt into the wet mixture. Gently fold everything together using a spatula until no dry streaks remain.
Avoid overmixing at this stage because too much mixing can make the brownies tough instead of tender.
The batter should look thick, glossy, and deeply red.
Step 5: Prepare the Cream Cheese Swirl
In a separate bowl, beat the cream cheese until smooth and creamy. Add the powdered sugar and mix until silky with no lumps remaining.
A smooth cream cheese mixture creates clean, beautiful swirls across the brownie surface.
Step 6: Layer the Batter
Pour most of the brownie batter into the prepared baking pan and spread it evenly into the corners.
Drop spoonfuls of the cream cheese mixture over the top, then add small spoonfuls of the remaining brownie batter.
Using a butter knife or skewer, gently swirl the mixtures together to create a marbled pattern. Avoid over-swirling so the colors remain distinct and dramatic.
Step 7: Bake the Red Velvet Brownies
Place the pan into the preheated oven and bake for about 28 to 35 minutes.
The edges should look set while the center remains slightly soft. A toothpick inserted near the center should come out with a few moist crumbs rather than wet batter.
Be careful not to overbake because the brownies continue cooking slightly as they cool.
Step 8: Cool Before Slicing
Allow the brownies to cool completely in the pan before lifting them out using the parchment paper.
Cooling helps the brownies firm up properly and gives cleaner slices. For extra neat squares, chill them briefly before cutting.
Using a warm knife wiped clean between cuts also helps create sharp bakery-style edges.
Step 9: Serve and Enjoy
Serve the brownies slightly warm for an ultra-gooey texture or chilled for a firmer bite.
They pair wonderfully with milk, coffee, hot chocolate, or vanilla ice cream. The rich cocoa flavor and creamy swirls make them perfect for holidays, parties, or everyday dessert cravings.
These brownies also make beautiful additions to dessert platters because of their striking red and white marbled appearance.
How Long to Prepare Red Velvet Brownies
Making red velvet brownies is surprisingly simple, and most of the time involved comes from allowing the brownies to cool properly before slicing. The preparation process itself is quick enough for busy weekdays, but the final result feels impressive enough for special occasions and holiday dessert tables.
The batter comes together in about 15 to 20 minutes, especially if all the ingredients are measured ahead of time. Preparing the cream cheese swirl only takes a few extra minutes, and the marbling process is simple while still creating a beautiful bakery-style finish.
Preparation Time
Preparing the ingredients, mixing the batter, and creating the cream cheese swirl usually takes around 20 minutes.
Baking Time
The brownies typically bake for 28 to 35 minutes depending on your oven and the thickness of the batter.
Cooling Time
For the cleanest slices and best texture, allow the brownies to cool for at least 1 hour before cutting.
Total Time
From start to finish, expect the entire process to take about 1 hour and 45 minutes including cooling time.
Tips for Perfect Red Velvet Brownies
Using room temperature eggs and cream cheese helps the batter mix smoothly and evenly. Cold ingredients can create lumps or uneven texture in the final brownies.
Always measure flour carefully using the spoon-and-level method. Adding too much flour can make the brownies dry instead of soft and fudgy.
Do not skip the vinegar. Even though the amount is small, it contributes to the subtle tang that gives red velvet desserts their signature flavor.
For a richer chocolate taste, use high-quality cocoa powder. Premium cocoa creates deeper flavor without overpowering the classic red velvet profile.
If you want extra clean cream cheese swirls, use a skewer or butter knife lightly instead of mixing deeply into the batter.
Avoid overbaking the brownies. They should still look slightly soft in the center when removed from the oven because they continue to set as they cool.
Chilling the brownies before slicing creates sharper edges and an even fudgier texture.
Watch Out for These Mistakes While Cooking
One common mistake is overmixing the batter after adding the flour. Too much mixing develops gluten, which can lead to dense or tough brownies.
Another issue is adding too much food coloring. Excess coloring can affect both the flavor and texture, so it is best to use only enough to achieve the desired shade of red.
Overbaking is one of the easiest ways to ruin the fudgy texture. Brownies should come out when the center still has a few moist crumbs attached to a toothpick.
Using cold cream cheese directly from the refrigerator can create lumpy swirls that do not spread evenly across the batter.
Cutting the brownies before they cool completely may cause them to fall apart and lose their neat shape.
Using a pan that is too large can also create thin, dry brownies instead of thick and rich squares.
What to Serve With Red Velvet Brownies?
Vanilla Ice Cream
The creamy coldness of vanilla ice cream pairs beautifully with the rich chocolate flavor and fudgy texture of red velvet brownies.
Fresh Strawberries
Fresh strawberries add brightness and a slightly tart flavor that balances the sweetness of the dessert.
Hot Coffee
A warm cup of coffee complements the cocoa flavor perfectly and makes these brownies feel even more indulgent.
Whipped Cream
Light whipped cream adds a soft and airy contrast to the dense brownie texture.
Hot Chocolate
Serving these brownies with rich hot chocolate creates the ultimate cozy dessert experience, especially during colder months.
Storage Instructions
Red velvet brownies store very well, making them perfect for preparing ahead of time for parties or gatherings.
Room Temperature Storage
Store the brownies in an airtight container at room temperature for up to 2 days. Place parchment paper between layers to prevent sticking.
Refrigerator Storage
Because of the cream cheese swirl, refrigeration is recommended for longer freshness. Keep the brownies in an airtight container in the refrigerator for up to 5 days.
Chilling also makes the texture even fudgier and richer.
Freezer Storage
These brownies freeze beautifully. Wrap each brownie individually in plastic wrap and place them in a freezer-safe container or bag.
They can be frozen for up to 3 months. Thaw overnight in the refrigerator or at room temperature before serving.
Reheating Tips
If you prefer warm brownies, microwave a slice for about 10 to 15 seconds to soften the texture and slightly melt the cream cheese swirl.
Estimated Nutrition
The nutritional values may vary slightly depending on ingredient brands and portion sizes.
- Calories: Approximately 320 per brownie
- Carbohydrates: 38g
- Protein: 4g
- Fat: 17g
- Saturated Fat: 10g
- Sugar: 28g
- Fiber: 1g
- Sodium: 180mg
Frequently Asked Questions
Can I Make Red Velvet Brownies Without Food Coloring?
Yes, you can leave out the food coloring completely if preferred. The brownies will still taste delicious, though they will have more of a chocolate-brown appearance.
Why Are My Brownies Dry?
Dry brownies are usually caused by overbaking or adding too much flour. Measuring carefully and checking the brownies early can help prevent this problem.
Can I Use Boxed Brownie Mix?
Yes, a boxed brownie mix can be used as a shortcut. Adding red food coloring and a cream cheese swirl can still create a red velvet-inspired dessert.
Do Red Velvet Brownies Need Refrigeration?
Because of the cream cheese topping, it is best to refrigerate them if storing for more than a day.
Can I Add Chocolate Chips?
Absolutely. White chocolate chips, dark chocolate chips, or semi-sweet chocolate chips all work wonderfully in this recipe.
Conclusion
Red velvet brownies are the perfect blend of rich chocolate flavor, velvety texture, and beautiful presentation. The creamy swirls, deep red color, and fudgy center make them a standout dessert for holidays, celebrations, or everyday baking.
One of the best things about these brownies is how simple they are to prepare while still looking incredibly impressive. Whether served warm with ice cream or enjoyed chilled straight from the refrigerator, they deliver a dessert experience that feels both comforting and elegant.
Once you make a batch, it becomes easy to see why these brownies are always such a crowd favorite. Their balance of sweetness, cocoa richness, and creamy tang makes every bite memorable.
Red Velvet Brownies
- Total Time: 1 hour 45 minutes
- Yield: 9 brownies
- Diet: Vegetarian
Description
These Red Velvet Brownies are rich, fudgy, soft, and packed with classic cocoa flavor combined with a creamy cheesecake swirl. Perfect for holidays, Valentine’s Day desserts, easy dessert ideas, party treats, or whenever you need a quick chocolate dessert, these brownies come together with simple ingredients and deliver bakery-style results every time. The deep red color, moist texture, and creamy topping make this an easy recipe that feels impressive enough for celebrations while still being simple enough for everyday baking.
Ingredients
1 cup unsalted butter
1 1/2 cups granulated sugar
2 large eggs
1 tablespoon vanilla extract
2 tablespoons cocoa powder
1 tablespoon red food coloring
1 cup all-purpose flour
1/4 teaspoon salt
1 teaspoon white vinegar
8 ounces cream cheese
1/3 cup powdered sugar
Instructions
1. Preheat the oven to 350°F and line an 8×8-inch baking pan with parchment paper.
2. Melt the butter and allow it to cool slightly.
3. In a large bowl, whisk together the melted butter and granulated sugar until smooth.
4. Add the eggs one at a time and whisk thoroughly after each addition.
5. Mix in the vanilla extract, red food coloring, and white vinegar.
6. Sift in the cocoa powder, flour, and salt, then gently fold the mixture until combined.
7. In a separate bowl, beat the cream cheese until smooth and mix with the powdered sugar.
8. Spread most of the brownie batter into the prepared pan.
9. Spoon the cream cheese mixture over the brownie batter.
10. Add small spoonfuls of the remaining brownie batter on top.
11. Use a knife or skewer to swirl the layers together gently.
12. Bake for 28 to 35 minutes or until the edges are set and the center is slightly soft.
13. Allow the brownies to cool completely before slicing and serving.
Notes
Do not overmix the batter after adding the flour to keep the brownies soft and fudgy.
Allow the brownies to cool completely before slicing for cleaner edges and better texture.
For extra neat slices, chill the brownies for 20 minutes before cutting with a warm knife.
- Prep Time: 20 minutes
- Cook Time: 30 minutes
- Category: Dessert
- Method: Baking
- Cuisine: American
Nutrition
- Serving Size: 1 brownie
- Calories: 320
- Sugar: 28g
- Sodium: 180mg
- Fat: 17g
- Saturated Fat: 10g
- Unsaturated Fat: 5g
- Trans Fat: 0g
- Carbohydrates: 38g
- Fiber: 1g
- Protein: 4g
- Cholesterol: 65mg
Keywords: red velvet brownies, fudgy brownies, easy dessert recipe, cheesecake brownies, chocolate brownies, holiday desserts, brownie recipe, easy baking recipe