
Imagine the perfect balance of rich, velvety cheesecake, sweet banana pudding, and fresh, juicy strawberries, all layered with crunchy cookie crumbles. This Strawberry Cheesecake Banana Pudding is a dessert that brings together the best of three classic treats into one indulgent bite. Whether you’re a fan of traditional banana pudding or love the tangy-sweetness of cheesecake, this combination offers a refreshing twist that will have you coming back for seconds.
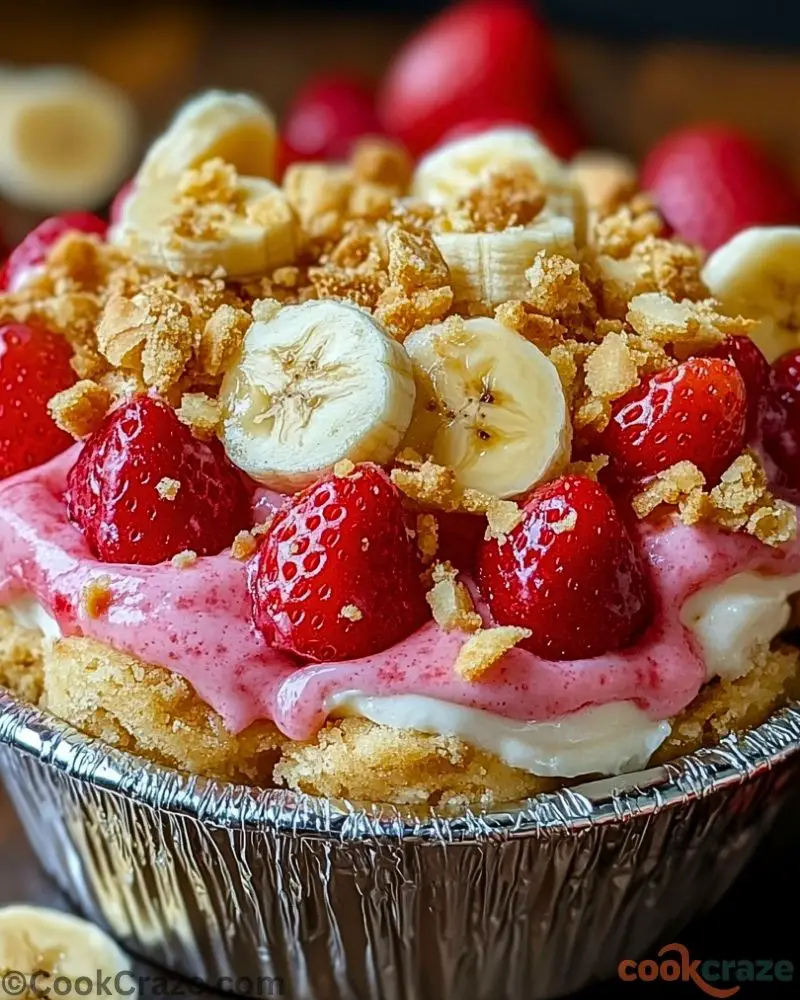
Each spoonful is a medley of textures—creamy pudding, smooth cheesecake filling, ripe bananas, and luscious strawberries, topped with a satisfying crunch of crushed cookies. It’s the kind of dessert that’s perfect for summer gatherings, holiday feasts, or simply treating yourself to something special. Easy to assemble and visually stunning, this pudding is as beautiful as it is delicious!
Why You’ll Love This Strawberry Cheesecake Banana Pudding
- Triple Flavor Combination – The fusion of banana pudding, cheesecake, and strawberries makes this dessert unforgettable.
- No-Bake and Easy to Make – Perfect for when you want an impressive dessert without turning on the oven.
- Versatile and Customizable – Swap the fruit, change the cookies, or adjust the sweetness to fit your preference.
- Crowd-Pleasing Dessert – Ideal for potlucks, family gatherings, and celebrations.
- Beautiful Presentation – With layers of colors and textures, this pudding is as much a feast for the eyes as it is for the taste buds.
Preparation Phase & Tools to Use
Before diving into this delicious Strawberry Cheesecake Banana Pudding, gathering the right tools will make the process smoother and more enjoyable. Here’s what you’ll need:
Essential Tools and Equipment
- Mixing Bowls – You’ll need a few to mix the cheesecake filling, pudding, and whipped topping separately.
- Electric Mixer (Hand or Stand Mixer) – Helps create a smooth and fluffy cheesecake mixture.
- Rubber Spatula – Ideal for folding ingredients together gently without deflating the whipped topping.
- Whisk – Perfect for mixing the pudding until it reaches a creamy consistency.
- Knife and Cutting Board – For slicing the bananas and strawberries evenly.
- Measuring Cups and Spoons – Ensures precise measurements for the pudding and cheesecake layers.
- Serving Dish or Individual Cups – You can make one large pudding dish or serve in smaller portions for a fun presentation.
Importance of Each Tool
Having an electric mixer speeds up the cheesecake preparation, ensuring a lump-free texture. The rubber spatula is great for incorporating whipped cream without over-mixing, which keeps the dessert light and airy. Using a whisk ensures the pudding mixture is smooth, while a sharp knife ensures clean cuts for the fruits, making your layers look as beautiful as they taste.
Preparation Tips
To get the best results, follow these preparation tips:
- Use Ripe Bananas – They should be slightly soft with no green, but not overly brown. This ensures a naturally sweet and creamy texture.
- Chill Your Ingredients – Keeping the cheesecake mixture and pudding cold before layering enhances the texture and flavor.
- Layer Strategically – Start with a cookie base, followed by pudding, cheesecake filling, and fruits to create visually appealing and well-balanced bites.
- Prevent Bananas from Browning – Lightly coat banana slices with lemon juice to keep them fresh longer.
- Crush Cookies Just Right – A mix of fine crumbs and larger chunks adds great texture. Avoid over-crushing them into powder.
- Let It Set – Refrigerate for at least 2 hours (or overnight) to allow the flavors to blend beautifully.
With these tools and tips in place, you’re ready to assemble a dessert that’s as delightful to make as it is to eat!
Ingredients for This Strawberry Cheesecake Banana Pudding
To create this luscious Strawberry Cheesecake Banana Pudding, you’ll need a mix of creamy, fruity, and crunchy ingredients. Here’s everything required for the perfect balance of flavor and texture:
For the Cheesecake Layer:
- 8 oz (1 block) cream cheese, softened
- ½ cup powdered sugar
- 1 tsp vanilla extract
- 1 cup whipped topping (like Cool Whip)
For the Pudding Layer:
- 1 box (3.4 oz) instant banana pudding mix
- 2 cups cold milk
- ½ cup sweetened condensed milk
For the Layers & Toppings:
- 2-3 bananas, sliced
- 1 ½ cups fresh strawberries, hulled and halved
- 2 cups vanilla wafers or graham crackers, crushed
- Extra whipped topping for garnish (optional)
These ingredients come together for an irresistible dessert that’s rich, fruity, and indulgent. Now that everything is ready, let’s get started on assembling it!

Step-by-Step Instructions
Step 1: Prepare the Cheesecake Filling
In a mixing bowl, beat the softened cream cheese, powdered sugar, and vanilla extract using an electric mixer until smooth and creamy. Gently fold in the whipped topping until fully combined. Set aside.
Step 2: Make the Banana Pudding
In another bowl, whisk together the instant banana pudding mix, cold milk, and sweetened condensed milk until thick and creamy. Let it sit for about 5 minutes to set properly.
Step 3: Crush the Cookies
Place vanilla wafers or graham crackers in a ziplock bag and crush them using a rolling pin. You can leave some bigger chunks for texture.
Step 4: Slice the Fruits
Cut the bananas into even slices and hull and halve the strawberries. If not assembling immediately, toss the banana slices lightly in lemon juice to prevent browning.
Step 5: Assemble the Layers
In a serving dish or individual dessert cups, start layering:
- A layer of crushed cookies at the bottom.
- A layer of banana pudding.
- A layer of the cheesecake mixture.
- A layer of sliced bananas and strawberries.
- Repeat the layers as needed, finishing with fruit and crushed cookies on top.
Step 6: Chill and Serve
Cover the pudding with plastic wrap and refrigerate for at least 2 hours (or overnight) to allow the flavors to blend. Serve chilled, garnished with extra whipped topping if desired.
This no-bake delight is now ready to enjoy! Each spoonful is a perfect combination of creamy, fruity, and crunchy goodness.
Notes
- Chilling is Key – Letting the pudding sit in the fridge for a few hours allows the flavors to meld together beautifully. Overnight chilling works best for a rich and well-set texture.
- Customize the Cookies – While vanilla wafers or graham crackers are traditional, you can experiment with shortbread cookies or even Biscoff biscuits for a unique twist.
- Use Fresh Whipped Cream – If you prefer homemade whipped cream over store-bought whipped topping, beat 1 cup of heavy cream with 2 tablespoons of powdered sugar until soft peaks form.
- Layer Creatively – You can assemble this dessert in a large trifle dish, individual cups, or even mason jars for a fun, portable option.
Watch Out for These Mistakes While Cooking
- Overmixing the Cheesecake Filling – Over-beating the cream cheese mixture can make it too loose. Mix just until smooth and fold in the whipped topping gently.
- Skipping the Chilling Step – If you don’t allow enough chilling time, the pudding layers may be too soft, and the flavors won’t fully develop.
- Using Overripe Bananas – If the bananas are too ripe, they can become mushy in the pudding. Slightly firm bananas work best.
- Not Coating Bananas – To prevent browning, lightly coat banana slices with lemon juice before layering.
- Soggy Cookie Layers – If you prefer a slight crunch in the cookie layers, don’t assemble too far in advance. For a softer texture, assemble the night before serving.
- Using Warm Ingredients – Ensure the cream cheese is softened but not warm, and keep the pudding cold for the best texture.
By avoiding these common pitfalls, your Strawberry Cheesecake Banana Pudding will turn out perfectly every time!
What to Serve With Strawberry Cheesecake Banana Pudding
This rich and fruity dessert pairs well with a variety of complementary treats and beverages. Here are some delicious options to enhance your serving experience:
8 Perfect Pairings
1. A Hot Cup of Coffee or Espresso
The bitterness of coffee balances the sweetness of the pudding, making it a perfect after-dinner pairing.
2. Iced Vanilla Latte
A chilled vanilla latte enhances the creamy flavors of the cheesecake and pudding layers while adding a refreshing contrast.
3. Fresh Whipped Cream & Caramel Drizzle
A dollop of freshly whipped cream with a drizzle of caramel or chocolate sauce takes this dessert to the next level.
4. Toasted Nuts
Sprinkle chopped pecans, almonds, or walnuts on top for added crunch and a nutty depth of flavor.
5. Dark Chocolate Shavings
The slight bitterness of dark chocolate complements the sweetness of the strawberries and bananas beautifully.
6. Vanilla or Strawberry Ice Cream
Serve a scoop of vanilla or strawberry ice cream alongside the pudding for an extra creamy indulgence.
7. A Light, Fruity Cocktail
A strawberry daiquiri or a banana colada makes a fun and festive pairing for a summer gathering.
8. Crispy Biscotti or Shortbread Cookies
Serving a crispy cookie on the side gives an added texture contrast to the creamy pudding layers.
No matter how you serve it, this Strawberry Cheesecake Banana Pudding is sure to be the star of any dessert spread!
Storage Instructions
To keep your Strawberry Cheesecake Banana Pudding fresh and delicious, follow these storage tips:
- Refrigeration – Store the pudding in an airtight container or cover it tightly with plastic wrap. It stays fresh for up to 3 days in the refrigerator.
- Prevent Soggy Layers – If making in advance, keep the cookie crumbles separate and add them just before serving to maintain their crunch.
- Banana Browning – If you notice bananas darkening, lightly coat them with lemon juice before layering to slow oxidation.
Reheating (If Applicable)
Since this is a chilled, no-bake dessert, reheating is not necessary. However, if serving from the fridge, let it sit at room temperature for about 10 minutes to soften slightly for the best texture.
Estimated Nutrition (Per Serving)
Nutritional values may vary based on ingredient brands and portion sizes.
- Calories: ~320
- Carbohydrates: 42g
- Protein: 5g
- Fat: 15g
- Saturated Fat: 8g
- Sugar: 28g
- Fiber: 2g
- Sodium: 180mg
This dessert is rich and indulgent, making it perfect for special occasions or when you’re craving a sweet treat!
Frequently Asked Questions
1. Can I make this dessert ahead of time?
Yes! It actually tastes better when made ahead, as the flavors have time to meld. For best results, prepare it the night before serving and store it in the refrigerator.
2. How do I keep the bananas from turning brown?
Lightly coat banana slices with a small amount of lemon juice or pineapple juice to prevent oxidation and keep them looking fresh.
3. Can I use fresh whipped cream instead of store-bought whipped topping?
Absolutely! Beat 1 cup of heavy cream with 2 tablespoons of powdered sugar until soft peaks form. This will give the dessert a homemade touch and a richer flavor.
4. What other fruits can I use instead of strawberries?
You can swap strawberries for blueberries, raspberries, or mango slices for a fun variation. Even a mix of different fruits works beautifully!
5. Can I use a different type of pudding?
Yes! While banana pudding is traditional, you can experiment with vanilla, cheesecake, or even white chocolate pudding for a unique flavor.
6. Will the cookies get too soggy?
If you prefer a crunchier texture, assemble the dessert just before serving or sprinkle the cookie crumbles on top instead of layering them.
7. Can I make this dairy-free?
Yes! Use dairy-free cream cheese, almond milk, and coconut whipped topping to make a lactose-free version of this dessert.
8. How long does this pudding last in the fridge?
It stays fresh for up to 3 days in the refrigerator. However, the cookies may soften over time, so enjoy it sooner for the best texture.
Conclusion
This Strawberry Cheesecake Banana Pudding is a no-bake masterpiece that combines the best of banana pudding, cheesecake, and fresh strawberries into one delightful dessert. With its creamy layers, sweet fruits, and crunchy cookie crumbles, it’s guaranteed to impress at any gathering. Whether you make it for a summer cookout, a holiday dessert table, or just because you’re craving something sweet, this recipe is sure to become a favorite.
Strawberry Cheesecake Banana Pudding: A Creamy, Fruity Delight
- Total Time: 2 hours 20 minutes
- Yield: 6-8 servings
Description
A delightful no-bake dessert that combines the rich creaminess of cheesecake, the fruity sweetness of banana pudding, and the fresh juiciness of strawberries. Layered with crushed cookies for the perfect crunch, this pudding is a crowd-pleaser for any occasion.
Ingredients
For the Cheesecake Layer:
- 8 oz (1 block) cream cheese, softened
- 1/2 cup powdered sugar
- 1 tsp vanilla extract
- 1 cup whipped topping (like Cool Whip)
For the Pudding Layer:
- 1 box (3.4 oz) instant banana pudding mix
- 2 cups cold milk
- 1/2 cup sweetened condensed milk
For the Layers & Toppings:
- 2–3 bananas, sliced
- 1 1/2 cups fresh strawberries, hulled and halved
- 2 cups vanilla wafers or graham crackers, crushed
- Extra whipped topping for garnish (optional)
Instructions
- Prepare the Cheesecake Filling – Beat softened cream cheese, powdered sugar, and vanilla extract with an electric mixer until smooth. Fold in the whipped topping until combined. Set aside.
- Make the Banana Pudding – In a separate bowl, whisk together the banana pudding mix, cold milk, and sweetened condensed milk until thickened. Let it sit for 5 minutes.
- Crush the Cookies – Place vanilla wafers or graham crackers in a ziplock bag and crush them with a rolling pin, leaving some larger chunks for texture.
- Slice the Fruits – Cut bananas and strawberries into even slices. Lightly coat banana slices with lemon juice to prevent browning.
- Assemble the Layers – In a serving dish or individual cups, layer as follows:
- A layer of crushed cookies
- A layer of banana pudding
- A layer of cheesecake mixture
- A layer of banana and strawberry slices
- Repeat as needed, finishing with fruit and cookie crumbles on top.
- Chill and Serve – Cover and refrigerate for at least 2 hours (or overnight) before serving. Garnish with extra whipped topping if desired.
- Prep Time: 20 minutes
- Chilling Time: 2 hours