
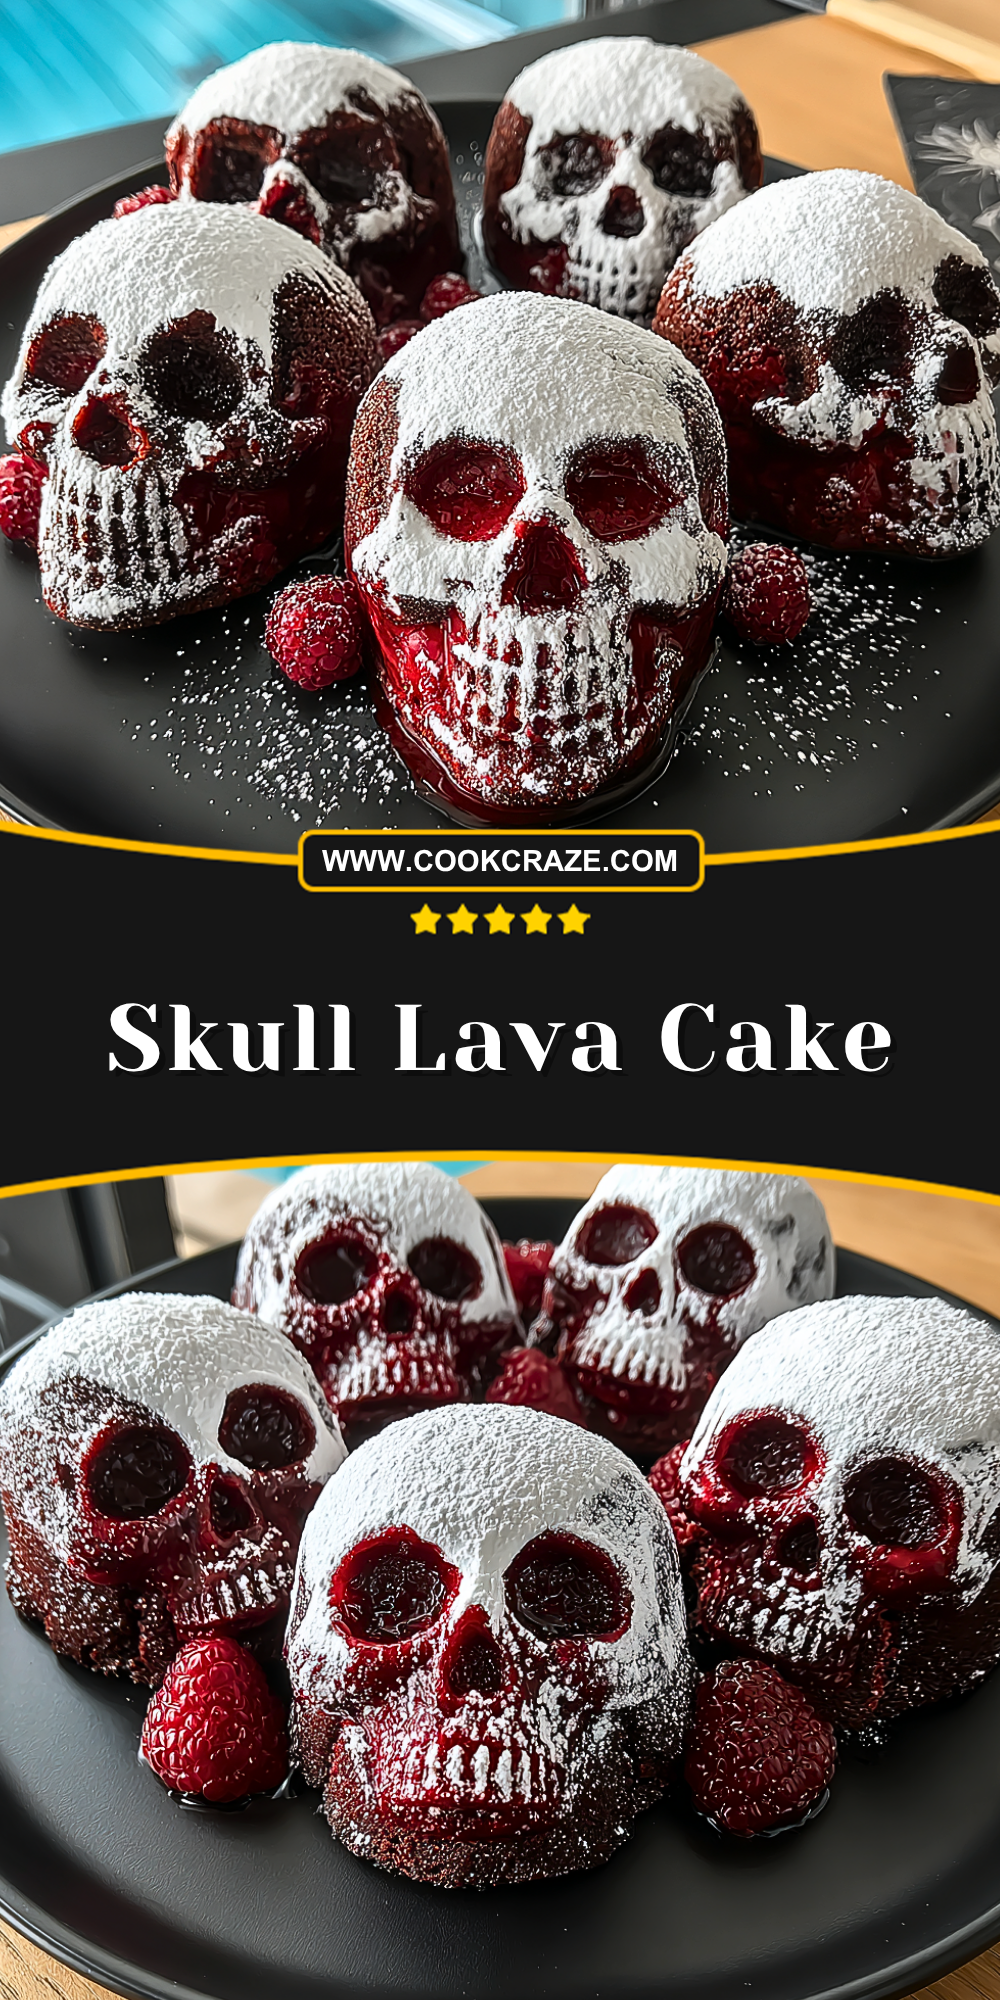
I still remember the first time I made these Skull Lava Cakes—it felt like bringing a spooky dessert straight out of a Halloween dream. The dramatic contrast between the deep red interior and the powdered white exterior makes each bite as exciting to look at as it is to eat. When you cut into one, that rich, molten center flows out like lava, creating a show-stopping moment every single time.
What I love most is how these cakes balance fun and flavor. They’re not just about looks—the texture is soft, fudgy, and indulgent, with a slightly crisp outer shell. Whether you’re planning a themed party or just want to surprise someone with a creative dessert, these skull-shaped treats never fail to impress.
Why You’ll Love This Skull Lava Cake
There’s something irresistibly fun about desserts that double as edible art. These Skull Lava Cakes are eye-catching and perfect for special occasions, especially Halloween or gothic-themed gatherings. The gooey center adds a luxurious touch that feels like a bakery-quality treat made right at home.
They’re also surprisingly simple to prepare. With the right mold and a few key ingredients, you can create a dessert that looks intricate but doesn’t require advanced baking skills. Plus, they’re customizable—flavor, color, and filling can all be adjusted to suit your taste.
What Makes Skull Lava Cake So Dramatic?
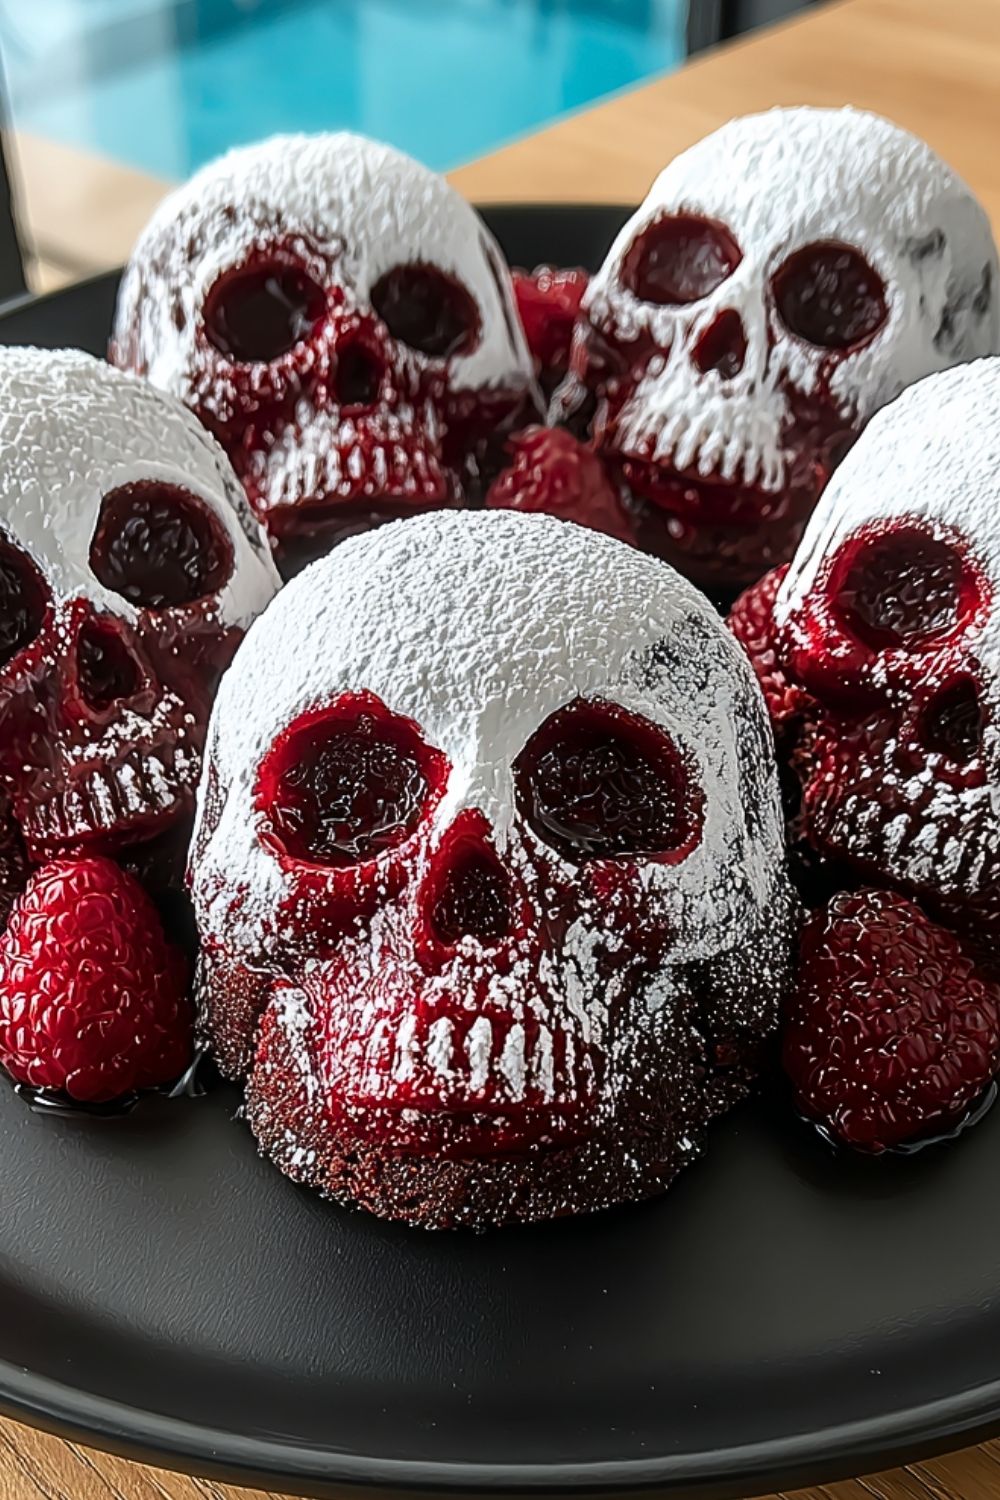
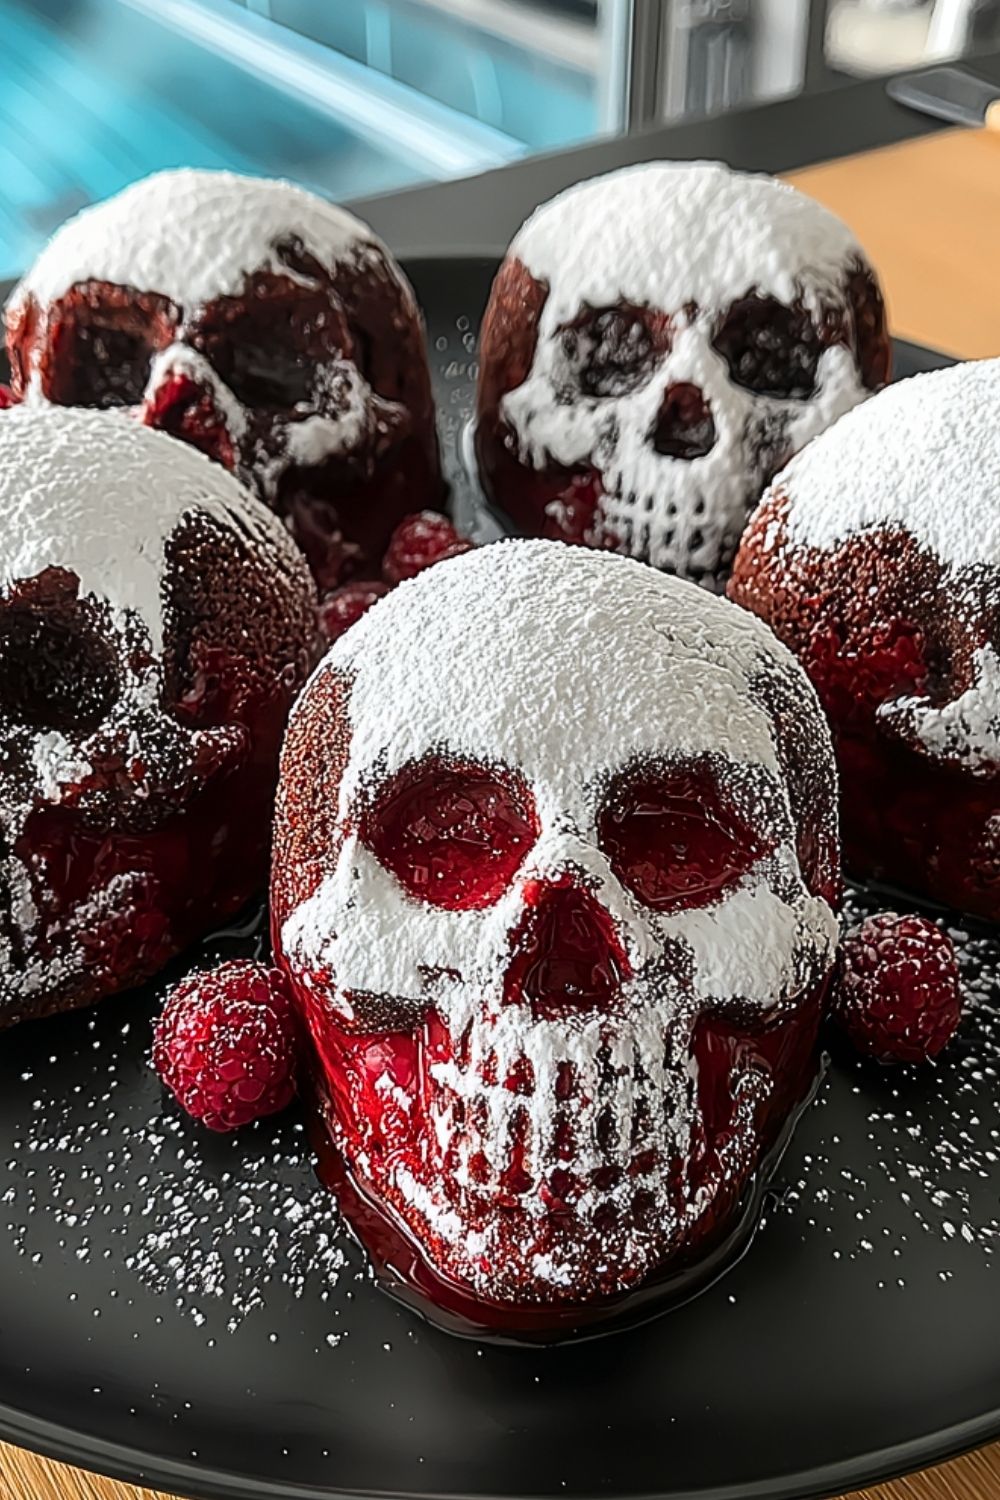
The secret lies in the combination of rich red cake and a molten center that mimics flowing lava. The skull mold enhances the visual appeal, giving the dessert its signature eerie look. A dusting of powdered sugar creates contrast, highlighting the skull features while keeping the presentation elegant.
Temperature control is key here. Slightly underbaking the center ensures that perfect lava effect, while the outer layer holds its shape beautifully. It’s a delicate balance, but once you get it right, it becomes second nature.
Options for Substitutions
If you don’t have red food coloring, you can use natural alternatives like beet powder or pomegranate juice to achieve a similar hue. For a different flavor twist, swap the classic chocolate base with a vanilla or dark cocoa variation.
Dietary needs can also be accommodated. Gluten-free flour blends work well in this recipe, and dairy-free butter and chocolate can easily replace traditional ingredients. Even the filling can be adjusted—try raspberry jam or caramel for a unique molten center.
Ingredients for this Skull Lava Cake
All-purpose flour – This forms the structure of the cake, giving it enough stability to hold the skull shape while still remaining soft and tender.
Unsweetened cocoa powder – Adds depth and richness to the chocolate flavor, creating that classic lava cake intensity.
Dark chocolate – The heart of the recipe, providing both flavor and the gooey molten center when melted properly.
Unsalted butter – Enhances richness and ensures a smooth, velvety texture throughout the batter.
Granulated sugar – Sweetens the cake and helps create that slightly crisp outer layer.
Eggs – Essential for binding the ingredients and giving the cake its soft, slightly airy structure.
Egg yolks – Add extra richness and contribute to the signature molten center.
Red food coloring – Gives the cake its dramatic red “lava” appearance, making the skull design pop visually.
Vanilla extract – Rounds out the flavor with a subtle sweetness and aromatic depth.
Salt – Balances the sweetness and intensifies the chocolate flavor.
Powdered sugar – Used for dusting, highlighting the skull details and adding a light sweetness on top.
Optional filling (chocolate ganache or fruit jam) – Enhances the lava effect and allows for creative flavor variations.
Step 1: Prepare the Skull Molds
Start by thoroughly greasing your skull-shaped molds with butter or a non-stick spray. This step is crucial to ensure the cakes release cleanly without damaging the intricate skull details. Lightly dust with cocoa powder instead of flour to maintain the chocolate flavor and avoid white residue.
Step 2: Melt the Chocolate and Butter
In a heatproof bowl, combine the dark chocolate and butter. Melt them together using a double boiler or in short bursts in the microwave, stirring in between until smooth and glossy. Allow the mixture to cool slightly so it doesn’t cook the eggs when combined.
Step 3: Whisk Eggs, Yolks, and Sugar
In a separate bowl, whisk the eggs, egg yolks, and granulated sugar until the mixture becomes pale, thick, and slightly fluffy. This step helps incorporate air, contributing to a delicate texture.
Step 4: Combine Wet Ingredients
Slowly pour the melted chocolate mixture into the egg mixture while whisking continuously. This prevents scrambling and ensures a smooth, cohesive batter. Add vanilla extract and red food coloring, mixing until evenly combined.
Step 5: Add Dry Ingredients
Sift together the flour, cocoa powder, and salt. Gently fold these into the wet mixture using a spatula. Avoid overmixing, as this can make the cakes dense instead of soft and gooey.
Step 6: Fill the Molds
Spoon a portion of the batter into each skull mold, filling it halfway. Add a small amount of ganache or jam in the center, then cover with more batter until the molds are about three-quarters full. This layering creates the molten core effect.
Step 7: Chill the Batter (Optional but Recommended)
Refrigerate the filled molds for 15–30 minutes. Chilling helps control the baking process and improves the contrast between the outer cake and the molten center.
Step 8: Bake to Perfection
Preheat your oven to 425°F (220°C). Place the molds on a baking tray and bake for 10–12 minutes. The edges should be set while the centers remain soft. Keep a close eye—just a minute too long can eliminate the lava effect.
Step 9: Rest Before Removing
Allow the cakes to rest in the molds for about 2–3 minutes after baking. This helps them firm up slightly, making it easier to remove without breaking.
Step 10: Unmold Carefully
Gently invert each mold onto a serving plate. Tap lightly if needed to release the cake. The skull shape should come out clean and detailed if properly greased.
Step 11: Decorate for the Skull Effect
Dust the tops with powdered sugar to highlight the skull contours. For extra drama, brush or drizzle a bit of red sauce or syrup into the eye sockets and mouth to enhance the “lava” look.
Step 12: Serve Immediately
Serve the Skull Lava Cakes while still warm to enjoy the full molten center effect. Cutting into them right away will reveal the rich, flowing interior that makes this dessert unforgettable.
How Long to Prepare the Skull Lava Cake
Preparing Skull Lava Cakes is surprisingly manageable, even though they look highly detailed and impressive. The preparation stage, which includes melting chocolate, mixing the batter, and filling the molds, typically takes about 20 to 25 minutes. If you decide to chill the batter for better structure and lava consistency, you should add an extra 15 to 30 minutes to your timeline.
The baking process itself is quick and requires close attention. These cakes bake in just 10 to 12 minutes at a high temperature. After baking, a short resting time of 2 to 3 minutes helps them set just enough for clean removal. In total, you can expect the entire process—from start to finish—to take around 40 to 60 minutes depending on whether chilling is included.
Tips for Perfect Skull Lava Cake
Achieving the perfect Skull Lava Cake comes down to precision and timing. Always use high-quality chocolate, as it directly impacts the flavor and texture of the molten center. Greasing the molds thoroughly is essential to preserve the skull details when unmolding.
Keep a close eye on baking time. The difference between a gooey center and a fully baked cake can be as little as one minute. If you’re unsure, slightly underbake rather than overbake. Letting the cakes rest briefly after baking also makes a big difference in maintaining their structure.
Watch Out for These Mistakes While Cooking
One common mistake is overmixing the batter after adding the flour, which can lead to dense cakes instead of soft, tender ones. Another issue is overheating the chocolate during melting, which can cause it to seize and ruin the texture.
Skipping the greasing step or doing it poorly can result in cakes sticking to the mold and losing their shape. Also, baking for too long will eliminate the molten center entirely, turning your lava cake into a standard cupcake-like texture.
What to Serve With Skull Lava Cake?
Vanilla Ice Cream
The cold, creamy texture of vanilla ice cream pairs beautifully with the warm, molten center, creating a perfect temperature contrast.
Fresh Berries
Strawberries, raspberries, or blackberries add a refreshing tartness that balances the richness of the cake.
Whipped Cream
Light and airy whipped cream complements the dense chocolate without overpowering it.
Chocolate Drizzle
A drizzle of melted chocolate enhances the overall indulgence and presentation.
Caramel Sauce
For an extra layer of flavor, caramel sauce adds sweetness and a slightly buttery depth.
Storage Instructions
If you have leftover Skull Lava Cakes, allow them to cool completely before storing. Place them in an airtight container and refrigerate for up to 3 days. Keep in mind that the molten center will firm up once chilled.
To reheat, place the cake in a microwave for about 20 to 30 seconds. This helps restore some of the gooey texture, though it may not be as fluid as when freshly baked. Avoid overheating during reheating, as this can dry out the cake.
For longer storage, you can freeze the unbaked filled molds. Wrap them tightly and freeze for up to one month. When ready to bake, you can place them directly in the oven, adding a couple of extra minutes to the baking time.
Estimated Nutrition
Each Skull Lava Cake is rich and indulgent, making it a dessert best enjoyed in moderation. On average, one serving contains approximately 300–400 calories, depending on the ingredients used and any additional fillings.
They typically include moderate amounts of fat from butter and chocolate, along with carbohydrates from sugar and flour. Protein content comes mainly from the eggs. Adjustments such as using less sugar or dairy-free alternatives can slightly change the nutritional profile.
Frequently Asked Questions
Can I make Skull Lava Cake without a skull mold?
Yes, you can use ramekins or any heat-safe molds. While you won’t get the skull shape, the lava cake effect will still be just as delicious.
How do I know when the lava cake is perfectly baked?
The edges should look firm and set, while the center remains soft. A slight jiggle in the middle is a good indicator of a molten interior.
Can I prepare the batter in advance?
Absolutely. You can prepare and fill the molds ahead of time, then refrigerate them until you’re ready to bake.
What type of chocolate works best?
High-quality dark chocolate with around 60–70% cocoa content works best for a rich and balanced flavor.
Can I make this recipe dairy-free?
Yes, by substituting butter with plant-based alternatives and using dairy-free chocolate, you can easily adapt the recipe.
Conclusion
Skull Lava Cake is the perfect combination of creativity and indulgence. It’s a dessert that not only satisfies your chocolate cravings but also delivers a visually stunning experience. With its molten center, rich flavor, and striking presentation, it’s bound to become a favorite for special occasions.
Once you master the timing and technique, this recipe becomes a reliable go-to for impressing guests or simply treating yourself to something extraordinary.
Skull Lava Cake
- Total Time: 40 minutes
- Yield: 6 cakes
- Diet: Vegetarian
Description
Get ready to impress with this spooky yet irresistible Skull Lava Cake—a perfect mix of rich chocolate flavor and a gooey molten center. This easy dessert is ideal for Halloween parties, themed gatherings, or anyone looking for creative food ideas. With its dramatic red lava filling and detailed skull shape, it’s not just a treat—it’s a showstopper. Whether you’re searching for easy dessert ideas, fun baking projects, or unique dinner party sweets, this recipe delivers both flavor and visual impact.
Ingredients
1 cup dark chocolate
1/2 cup unsalted butter
1/2 cup granulated sugar
2 large eggs
2 egg yolks
1 teaspoon vanilla extract
1 teaspoon red food coloring
1/4 cup all-purpose flour
2 tablespoons unsweetened cocoa powder
1/4 teaspoon salt
1/4 cup chocolate ganache or fruit jam
2 tablespoons powdered sugar
Instructions
1. Grease skull molds thoroughly with butter and dust lightly with cocoa powder.
2. Melt dark chocolate and butter together until smooth, then let cool slightly.
3. Whisk eggs, egg yolks, and sugar until pale and slightly thickened.
4. Slowly mix melted chocolate into the egg mixture while whisking continuously.
5. Add vanilla extract and red food coloring, mixing evenly.
6. Sift flour, cocoa powder, and salt, then gently fold into the batter.
7. Fill molds halfway with batter, add ganache or jam in the center, then cover with more batter.
8. Chill molds for 15–30 minutes for better structure.
9. Bake at 425°F (220°C) for 10–12 minutes until edges are set and centers are soft.
10. Let cakes rest for 2–3 minutes before unmolding.
11. Carefully invert onto a plate and dust with powdered sugar.
12. Serve immediately for the best molten lava effect.
Notes
Use high-quality chocolate for the best flavor and texture.
Do not overbake or the molten center will disappear.
Grease molds thoroughly to preserve the skull shape when unmolding.
- Prep Time: 25 minutes
- Cook Time: 12 minutes
- Category: Dessert
- Method: Baking
- Cuisine: American
Nutrition
- Serving Size: 1 cake
- Calories: 350
- Sugar: 22g
- Sodium: 120mg
- Fat: 22g
- Saturated Fat: 13g
- Unsaturated Fat: 7g
- Trans Fat: 0g
- Carbohydrates: 32g
- Fiber: 2g
- Protein: 5g
- Cholesterol: 110mg
Keywords: skull lava cake, halloween dessert, easy dessert, chocolate lava cake, spooky food ideas, party desserts