

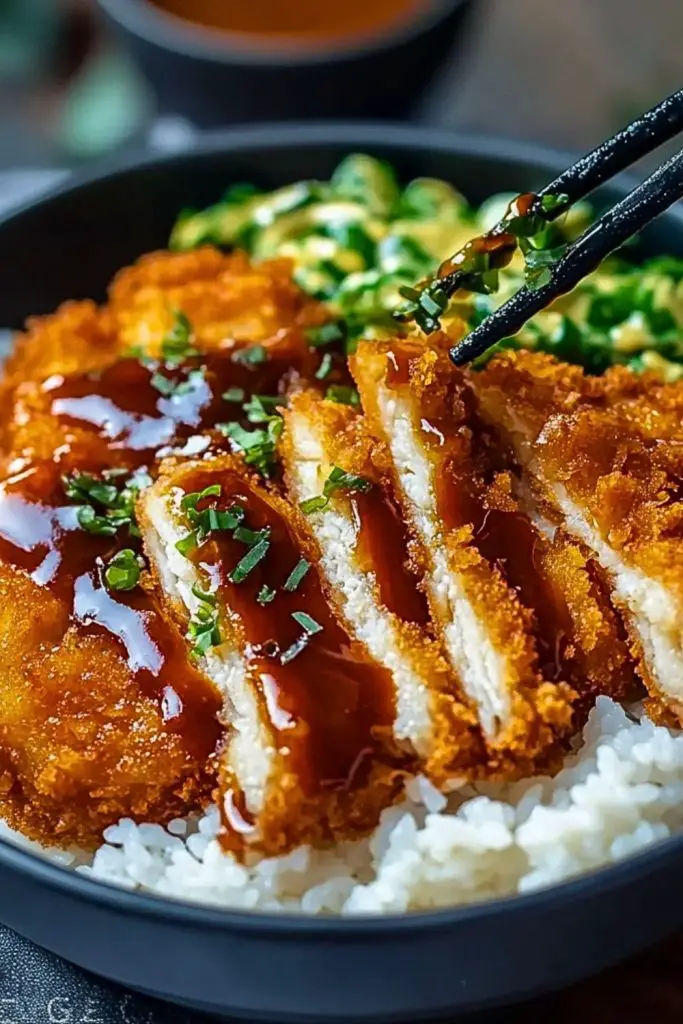
Crispy, golden panko-breaded chicken cutlets laid gently on a fluffy bed of steaming white rice—drizzled with creamy mayo and thick, savory-sweet tonkatsu sauce. That’s what pulled me into the world of Japanese Katsu Bowls. I remember my first bite: the crunch of the coating, the juicy tenderness of the chicken, and the perfect balance of sweet, tangy, and umami flavors in the sauce. It was more than comfort food—it was a full sensory hug in a bowl.
Over time, this recipe has become a favorite in my kitchen. It’s not just about the taste (which is phenomenal), but how easy and satisfying it is to prepare. You get that restaurant-quality meal without needing a trip to a Japanese eatery. It’s an ideal dish for busy weeknights, weekend cravings, or whenever you want something that feels special but doesn’t demand hours in the kitchen.
Why You’ll Love This Japanese Katsu Bowl with Tonkatsu Sauce
- Crispy & Juicy: The panko coating gives the cutlet a light, airy crunch that pairs beautifully with the juicy chicken inside.
- Deeply Flavorful Sauce: The tonkatsu sauce is tangy, sweet, and rich—making every bite more addictive than the last.
- Easy but Impressive: It looks gourmet, but it’s totally doable in under an hour.
- Customizable: Swap the protein, play with the toppings, or add a soft-boiled egg—make it yours.
- Perfect Balance: The richness of the katsu is mellowed by the simplicity of steamed rice and the sharpness of the sauce.
What Kind of Meat Should I Use for Japanese Katsu Bowls?
While chicken katsu is the most common and beloved version, you’re not limited to it. Traditionally, tonkatsu refers to pork cutlets—usually pork loin or tenderloin. But in modern kitchens (and especially for quick meals), chicken breasts or chicken thighs work beautifully.
- Chicken Breast: Lean and quick to cook. Slice it in half lengthwise for even cooking and a classic katsu shape.
- Chicken Thigh: Juicier and more forgiving. It gives a richer flavor and stays moist even if slightly overcooked.
- Pork Loin/Tenderloin: More traditional, with a satisfying chew. Just be sure not to overcook it.
- Tofu or Plant-Based Alternatives: For a vegetarian twist, firm tofu or meat substitutes like seitan can be breaded and fried the same way.
No matter what protein you choose, the key is a thin cutlet, pounded if needed, to ensure quick, even frying and that satisfying crispy bite.
Options for Substitutions
This dish is versatile. Whether you’re swapping for dietary reasons or just based on what’s in your fridge, here are some great alternatives:
- Panko Breadcrumbs → Use crushed cornflakes or regular breadcrumbs if needed, but panko gives that signature light crunch.
- Tonkatsu Sauce → No bottle? Mix ketchup, Worcestershire sauce, soy sauce, and a pinch of sugar for a fast DIY version.
- Steamed White Rice → Brown rice, sushi rice, or even cauliflower rice can sub in nicely.
- Egg (for breading) → If avoiding eggs, use a mixture of flour and plant-based milk or cornstarch slurry to help the crumbs stick.
- Flour (for dredging) → Gluten-free flour blends or even cornstarch work well for coating the meat before egg and breadcrumbs.
These swaps won’t compromise the soul of the dish. You’ll still get a deeply satisfying, golden-crisp katsu bowl experience.
Ingredients for This Japanese Katsu Bowl with Tonkatsu Sauce
Each ingredient in this recipe plays a role in building layers of texture and flavor—from the base of soft rice to the rich sauce on top. Here’s what you’ll need and why:
- Chicken Breast (or Thigh)
This is the star of the show. Sliced thinly and breaded, it provides the crispy, juicy bite that defines a katsu bowl. - Salt & Black Pepper
A simple seasoning that enhances the natural flavor of the chicken before it’s breaded. - All-Purpose Flour
Acts as the first layer in the breading process, helping the egg cling to the meat. - Egg
Binds the panko breadcrumbs to the chicken, ensuring a secure coating that fries up perfectly. - Panko Breadcrumbs
Japanese-style breadcrumbs that fry up light and crunchy—essential for that signature katsu texture. - Oil (Vegetable or Canola)
Used for shallow frying. Choose a neutral oil with a high smoke point for crisp results without overpowering the flavors. - Steamed White Rice
Serves as the base of the bowl. It soaks up all the sauces and balances the richness of the katsu with its clean flavor. - Tonkatsu Sauce
A thick, tangy-sweet condiment that brings everything together. You can use store-bought or make your own with ketchup, Worcestershire, soy sauce, and sugar. - Japanese Mayo (Optional but Recommended)
Adds a creamy, umami-rich drizzle over the top, complementing the crispy chicken and rice. - Chopped Fresh Parsley or Green Onion
A garnish that adds a pop of color and freshness to contrast the rich tones of the dish.
Step-by-Step Instructions for Japanese Katsu Bowls with Tonkatsu Sauce
Let’s break this down into simple steps so you can make these golden-crisp, saucy katsu bowls in your own kitchen with confidence.
Step 1: Prepare the Chicken
- Slice the chicken breasts in half lengthwise to create thinner cutlets.
- If needed, gently pound them to an even thickness (about ½ inch).
- Season both sides with salt and black pepper.
Step 2: Set Up the Breading Station
- Grab three shallow bowls or plates:
- One with flour.
- One with beaten egg.
- One with panko breadcrumbs.
- Dredge each cutlet first in flour (shake off excess), then dip it in egg, and finally press it into the panko until well coated.
Step 3: Fry the Chicken
- Heat a generous layer of vegetable oil in a large skillet over medium heat.
- Once hot (about 350°F/175°C), carefully place the breaded cutlets into the pan.
- Fry for about 3–4 minutes per side, or until golden brown and fully cooked through.
- Transfer to a wire rack or paper towel-lined plate to drain.
Step 4: Prepare the Rice
- While the chicken is frying, cook or reheat your steamed white rice.
- Fluff it up with a fork and scoop it into serving bowls as your base.
Step 5: Slice the Katsu
- Let the fried chicken rest for a minute, then slice it crosswise into strips.
- This makes it easier to eat and helps the sauce cling to the crispy edges.
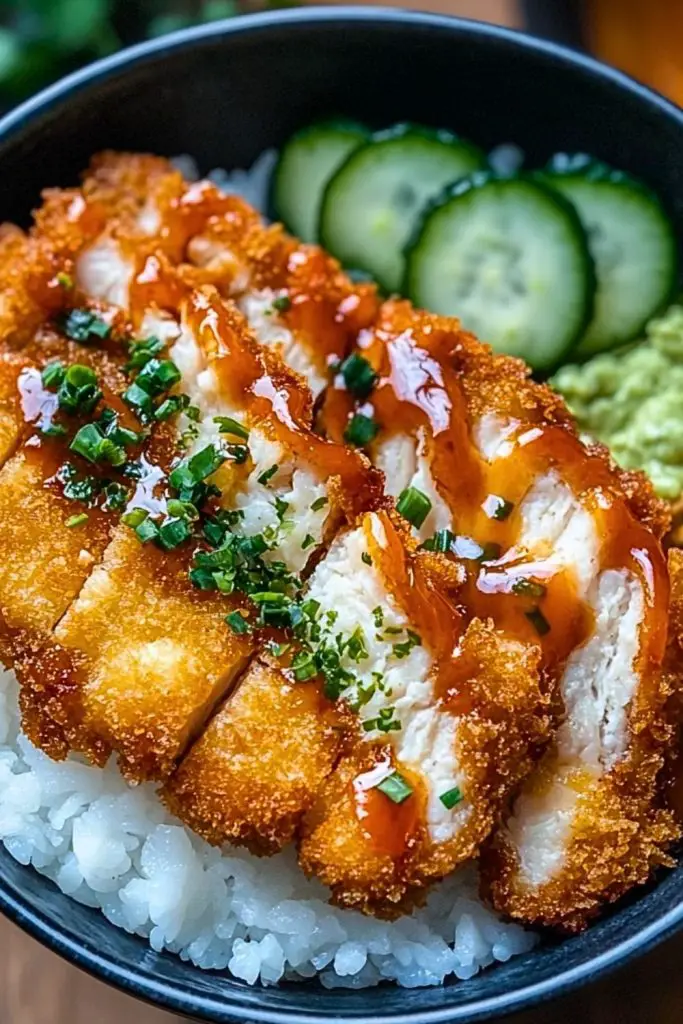
Step 6: Assemble the Bowls
- Lay the sliced chicken katsu neatly over the bed of rice.
- Drizzle with tonkatsu sauce and, if using, Japanese mayo.
- Sprinkle with chopped parsley or green onion for a fresh, vibrant finish.
How Long to Cook the Japanese Katsu Bowl
Timing is everything when it comes to katsu—just enough to get that golden crust while keeping the meat juicy.
- Chicken Katsu Frying Time:
Fry each breaded cutlet for about 3 to 4 minutes per side over medium heat. The outside should turn a deep golden brown, and the internal temperature should reach 165°F (74°C). - Rice Cooking Time:
If making from scratch, Japanese short-grain rice typically takes 15–20 minutes to cook, plus 10 minutes resting time. You can also use a rice cooker or reheat leftover rice. - Total Time to Prepare:
From start to finish, this recipe takes around 40–45 minutes including prep, frying, and assembling the bowls.
Tips for Perfect Japanese Katsu Bowl
- Use Thin, Even Cutlets: Uniform thickness ensures even cooking and a great crunch-to-meat ratio.
- Double Dip If Needed: For extra crunch, you can double-coat the chicken (egg → panko → egg → panko again).
- Don’t Overcrowd the Pan: Fry in batches if needed to avoid steaming and get that crisp finish.
- Keep the Oil Hot but Not Smoking: Around 350°F (175°C) is ideal. Too hot, and it burns; too cool, and the katsu gets soggy.
- Drain on a Wire Rack: This helps the crust stay crispy. Paper towels can cause steam and make it soggy underneath.
- Warm Rice = Happy Bowl: Always serve the rice hot so the sauces can melt and blend into the grains.
- Sauce Last Minute: Drizzle sauces just before serving to preserve that beautiful crispy coating.
- Japanese Mayo is Magic: Just a light squiggle adds creamy umami depth—don’t skip it if you can help it.
Watch Out for These Mistakes While Cooking
Even though Japanese Katsu Bowls are pretty straightforward, a few small missteps can dull the crispiness or throw off the balance. Here’s what to look out for:
- Skipping the Seasoning
Always season your chicken before breading. Salt and pepper aren’t just optional—they bring the whole dish to life. - Breading Too Early
Don’t bread the cutlets hours in advance. The moisture will soak into the coating, and you’ll lose that crunch. - Frying in Cold Oil
If your oil isn’t hot enough, the katsu will absorb it like a sponge. Make sure it’s shimmering (about 350°F/175°C) before the cutlets hit the pan. - Overcrowding the Pan
This drops the oil temperature fast. Fry in batches to ensure each piece gets golden and crispy. - Slicing Right Away
Let the katsu rest for a minute or two before cutting. This helps keep the juices inside the meat. - Using the Wrong Breadcrumbs
Standard breadcrumbs don’t have the same airy crunch as panko. For that signature texture, stick with the real thing. - Overcooking the Chicken
Thin cutlets cook quickly. Keep a close eye and pull them as soon as they hit 165°F internally. - Drenching in Sauce Too Early
Saucing the katsu too soon can make it soggy. Always wait until right before serving to add your drizzle.
What to Serve With Japanese Katsu Bowls?
You’ve got your crisp chicken and rice—now let’s build out the meal. Here are some favorite pairings to round out your bowl:
1. Miso Soup
A light, umami-rich starter that warms the soul and balances the richness of the katsu.
2. Pickled Ginger or Daikon (Takuan)
These pickles bring a bright, tangy contrast and help cleanse the palate between bites.
3. Cabbage Slaw with Sesame Dressing
A crunchy side that’s traditional in Japan, adding freshness and a bit of bitterness to offset the savory main.
4. Edamame with Sea Salt
Simple, salty, and satisfying—a great snackable side that’s also full of protein.
5. Soft-Boiled Egg
Cut one in half and lay it right over the bowl for an extra touch of creaminess and visual appeal.
6. Japanese Potato Salad
Creamy, slightly sweet, and filled with finely diced vegetables—it’s a comfort-food favorite.
7. Steamed Broccoli or Bok Choy
A touch of green makes the plate pop and adds a nutritional boost.
8. Green Tea or Iced Genmaicha
A clean, slightly bitter tea is the perfect way to cleanse the palate and round out the meal.
Storage Instructions
If you happen to have leftovers (though it’s rare with these bowls!), you’ll want to store them properly to preserve as much crispiness and flavor as possible.
Storing the Chicken Katsu
- Refrigerator:
Place leftover cutlets in an airtight container with a paper towel at the bottom to absorb excess moisture. Store for up to 3 days. - Freezer:
Wrap each piece individually in plastic wrap or foil, then place in a freezer bag. Freeze for up to 2 months. Reheat in an oven or air fryer for best texture.
Reheating Tips
- Oven: Bake at 375°F (190°C) for about 10–15 minutes until hot and crispy again.
- Air Fryer: Perfect for restoring crunch—375°F for 5–7 minutes.
- Microwave: Not ideal for breaded foods, but acceptable in a pinch. Just know the coating will soften.
Storing the Rice
- Store cooked rice in a separate airtight container. It will keep in the fridge for 3–4 days. Splash with a bit of water and cover with a damp paper towel before microwaving to revive the texture.
Estimated Nutrition
Keep in mind the following values are approximate and can vary based on portion size, specific brands used, and substitutions. Here’s a general idea for one serving of a Japanese Katsu Bowl with tonkatsu sauce:
- Calories: 650–750 kcal
- Protein: 35–40g
- Carbohydrates: 65–70g
- Fat: 30–35g
- Saturated Fat: 6g
- Fiber: 2–3g
- Sugar: 8–10g
- Sodium: 800–1000mg
Frequently Asked Questions
Let’s cover the most common questions that come up when making Japanese Katsu Bowls with Tonkatsu Sauce—so you can head to the kitchen fully prepared.
1. Can I bake or air fry the katsu instead of frying it?
Yes! For a lighter version, you can air fry at 375°F (190°C) for about 12–15 minutes, flipping halfway. For oven-baked, place on a wire rack over a sheet pan and bake at 400°F (200°C) for 20–25 minutes. Spray lightly with oil for that golden finish.
2. What if I can’t find tonkatsu sauce at the store?
No worries—you can make your own. Mix 3 tablespoons ketchup, 1 tablespoon Worcestershire sauce, 1 teaspoon soy sauce, and 1 teaspoon sugar. It’s a close match and super tasty.
3. Can I make this gluten-free?
Absolutely! Use gluten-free flour and gluten-free panko (available in most stores). Double-check the soy sauce and tonkatsu sauce too—gluten-free versions are widely available.
4. Is this dish spicy?
Nope, not at all. It’s rich, savory, and slightly sweet. If you like a little kick, add some chili oil or sprinkle shichimi togarashi on top.
5. Can I prep the chicken in advance?
Yes, you can season and bread the chicken ahead of time. Store it uncovered in the fridge for up to 4 hours before frying. This actually helps the crust stick better!
6. How do I get the panko coating extra crispy?
Use fresh, dry panko and don’t crowd the pan when frying. A light press into the breadcrumbs helps the coating adhere tightly. Fry in hot oil and let it drain on a wire rack, not paper towels.
7. What kind of rice is best?
Short-grain Japanese rice is ideal—it’s sticky enough to hold together but still fluffy. Jasmine rice or sushi rice are also great substitutes if that’s what you have.
8. Can I make this dish vegetarian or vegan?
Definitely. Swap the chicken for firm tofu or plant-based cutlets. Use dairy-free mayo and ensure your tonkatsu sauce is vegan-friendly (some have anchovies).
Conclusion
Japanese Katsu Bowls with Tonkatsu Sauce are one of those magical meals that feel indulgent yet are easy enough to make on any weeknight. With crispy golden cutlets, comforting warm rice, and bold, tangy-sweet sauce, every element hits the mark.
It’s endlessly customizable, and once you make it once, you’ll keep coming back for more. Whether you’re cooking for yourself, family, or friends—it’s a guaranteed crowd-pleaser that tastes like it came straight from a Japanese kitchen.

Japanese Katsu Bowls with Tonkatsu Sauce
- Total Time: 35 minutes
- Yield: 2 servings
Description
Crispy, juicy chicken cutlets coated in airy panko crumbs, served over fluffy steamed rice, and topped with rich, tangy-sweet tonkatsu sauce and a swirl of Japanese mayo—this Japanese Katsu Bowl is the ultimate comfort food meets restaurant-style flavor. Whether you’re hunting for a quick dinner idea, a new addition to your easy recipe list, or something satisfying yet fun for your next food idea, this bowl delivers. The contrast of textures and the savory umami flavors make every bite irresistible. It’s a must-try for anyone who loves quick meals with big flavor payoff—perfect for dinner ideas, healthy snack cravings, or even a next-day lunch.
Ingredients
- 2 boneless, skinless chicken breasts (or thighs)
- Salt and black pepper, to taste
- 1/2 cup all-purpose flour
- 2 large eggs, beaten
- 1 1/2 cups panko breadcrumbs
- Vegetable oil for frying
- 2 cups steamed white rice
- 1/4 cup tonkatsu sauce (store-bought or homemade)
- 2 tablespoons Japanese mayonnaise (optional)
- Chopped parsley or green onion, for garnish
Instructions
- Slice chicken breasts in half lengthwise to create thin cutlets. Pound to even thickness if needed.
- Season both sides with salt and pepper.
- Set up a breading station with 3 shallow bowls: one with flour, one with beaten eggs, and one with panko.
- Dredge chicken in flour, then dip into egg, then press into panko until fully coated.
- Heat about 1/2 inch of vegetable oil in a skillet over medium heat. Once hot, fry chicken cutlets for 3–4 minutes per side until golden brown and cooked through.
- Transfer to a rack or paper towel to drain. Let rest for 1 minute.
- Slice the chicken into strips.
- Spoon rice into bowls, layer with sliced chicken, and drizzle with tonkatsu sauce and mayo.
- Garnish with chopped parsley or green onion. Serve immediately.
- Prep Time: 15 minutes
- Cook Time: 20 minutes