

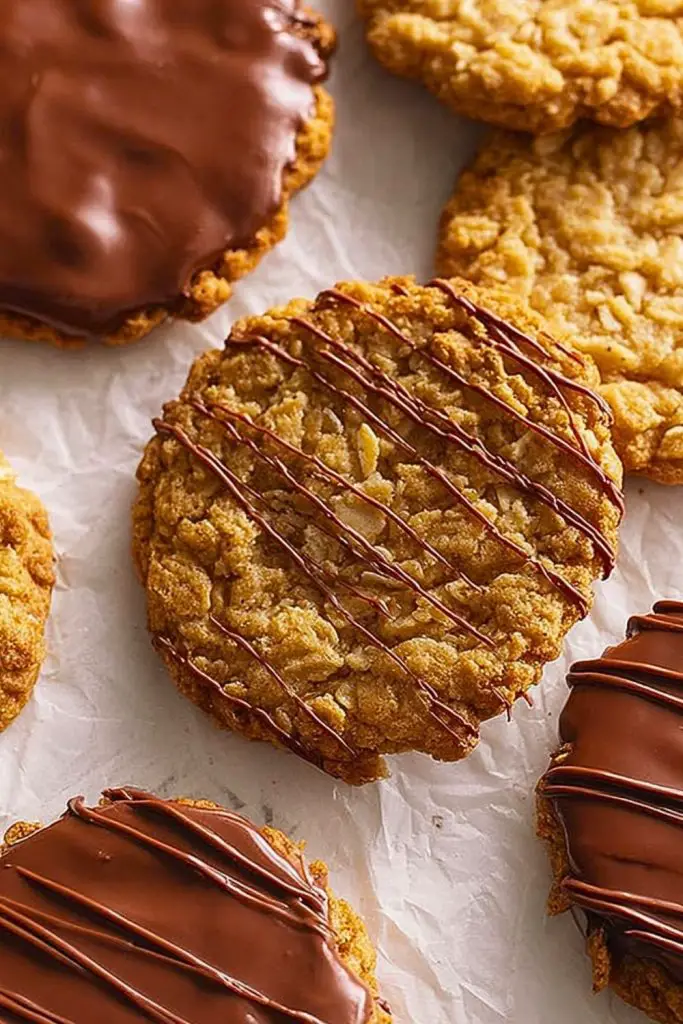
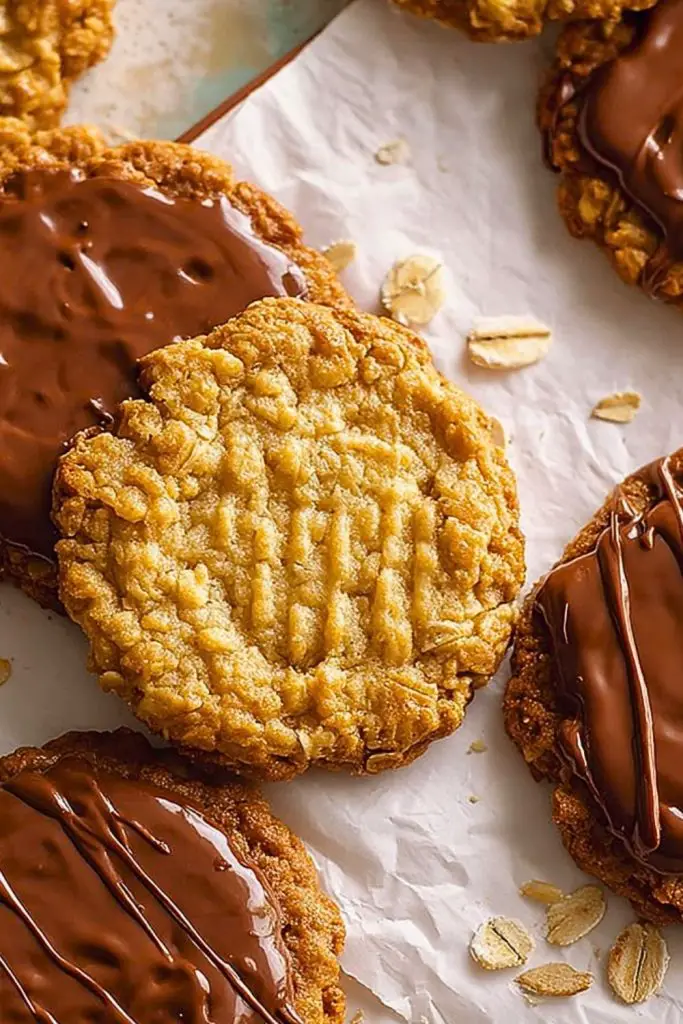
I’ve always had a soft spot for biscuits that manage to balance simplicity with indulgence—and Homemade Chocolate Hobnobs do just that. These classic British oat biscuits are crisp, buttery, and just the right amount of sweet, with a satisfying crunch that’s made even better with a generous layer of smooth melted chocolate on top. Whether you’re a dunker or a nibbler, there’s something deeply comforting about these nostalgic treats.
The best part? They’re incredibly easy to make from scratch, using pantry staples. Once you bake your first batch, you’ll never want to go back to the store-bought version. I’ve experimented with a few variations over the years, and I’m sharing the one that delivers the perfect balance of texture, flavor, and that iconic chocolate topping.
Why You’ll Love This Homemade Chocolate Hobnobs Recipe
Homemade Chocolate Hobnobs are more than just a cookie—they’re a satisfying, nostalgic bite of comfort. With golden rolled oats, brown sugar, and a hint of vanilla, these biscuits are rich in flavor and have a crisp yet chewy bite. The addition of melted chocolate (either milk or dark, your choice) turns them from everyday snack to tea-time luxury.
They’re great for lunchboxes, afternoon tea, or cozy nights with a warm drink. Plus, they keep well and freeze beautifully—if you can resist eating them all fresh out of the oven.
What Kind of Oats Should I Use for Homemade Chocolate Hobnobs?
When it comes to getting that classic Hobnob texture, rolled oats are your best friend. I recommend using old-fashioned rolled oats because they provide that signature bite and chewiness. Quick oats can make the biscuits too soft, and steel-cut oats won’t cook properly in the dough. The oats are what give these biscuits their character, so don’t swap them out unless you’re looking for a different texture altogether.
If you’re in a pinch, you can pulse quick oats a couple of times in the food processor to mimic the texture of rolled oats, but nothing beats the real deal.
Options for Substitutions
Even though this recipe is pretty straightforward, it’s flexible enough for a few thoughtful swaps:
- Butter: You can substitute with plant-based butter for a dairy-free version. Just make sure it’s a firm block-style one for similar results.
- Golden syrup: This adds that classic caramel note. If you can’t find it, try using honey or light corn syrup. Maple syrup works too, but will slightly alter the flavor.
- Brown sugar: Feel free to use light or dark brown sugar depending on how rich you want the taste. Coconut sugar can be used for a less processed option.
- Flour: Regular all-purpose flour works best, but you can try a gluten-free blend if you need a GF version—just avoid using only almond or coconut flour.
- Chocolate topping: Use milk, dark, or even vegan chocolate based on preference. A drizzle of white chocolate can also be a fun twist.
Don’t be afraid to play with flavors if you’re comfortable experimenting—just keep the oat-to-butter ratio intact for that perfect Hobnob crunch.
Ingredients for Homemade Chocolate Hobnobs
Each ingredient in this recipe plays a key role in achieving that perfect balance of crunch, sweetness, and rich chocolate coating. Here’s what you’ll need and why:
- Rolled Oats: These provide the signature Hobnob texture—chewy, hearty, and slightly nutty.
- All-Purpose Flour: Gives structure to the biscuit so it holds its shape while baking.
- Brown Sugar: Adds sweetness and a subtle molasses depth that complements the oats beautifully.
- Baking Soda: Helps the biscuits rise just enough and adds a slight crispness.
- Salt: A small amount sharpens the flavors and balances the sweetness.
- Unsalted Butter: Delivers richness and helps bind the oats and flour into a cohesive dough.
- Golden Syrup: Brings moisture and a warm, caramel-like note that sets these apart from ordinary oat cookies.
- Vanilla Extract: Enhances the overall flavor and brings warmth to the biscuit base.
- Milk or Dark Chocolate: Melted and spread on top, it transforms the biscuit into something extra special.
You won’t need anything fancy—just good, honest ingredients that come together to make an iconic, crave-worthy biscuit.
Step 1: Prepare the Dough
Start by preheating your oven to 350°F (175°C) and lining two baking sheets with parchment paper. In a large mixing bowl, combine the rolled oats, flour, brown sugar, baking soda, and salt. Mix until evenly distributed. In a small saucepan over low heat, melt the butter and golden syrup together, then remove from heat and stir in the vanilla extract.
Step 2: Combine Wet and Dry Ingredients
Pour the melted butter mixture into the dry ingredients. Stir everything together using a wooden spoon or spatula until the dough comes together. It will be slightly crumbly but should hold when pressed.
Step 3: Shape the Biscuits
Scoop about a tablespoon of dough and roll it into a ball. Flatten each one gently between your palms to form a round disc, then place them on the prepared baking sheet, leaving about 2 inches between each. You can gently press them down with the back of a spoon for a more uniform thickness.
Step 4: Bake
Bake in the preheated oven for 12–15 minutes, or until the edges are golden brown and the centers are just set. Let them cool on the baking sheet for a few minutes before transferring to a wire rack to cool completely.
Step 5: Add the Chocolate Topping
Once the biscuits have cooled, melt your choice of chocolate (milk or dark) in a heatproof bowl over simmering water or in short bursts in the microwave. Spoon a generous amount onto each biscuit and spread it to cover the top. For that classic look, drizzle extra chocolate across the top using a fork or piping bag.
Let the chocolate set at room temperature—or pop them in the fridge for quicker results.
How Long to Cook Homemade Chocolate Hobnobs
Homemade Chocolate Hobnobs should be baked for 12 to 15 minutes at 350°F (175°C). Keep an eye on them from the 12-minute mark; you’re looking for golden edges and a slightly soft center. They’ll continue to firm up as they cool on the tray. Overbaking can make them too crisp, so don’t wait for them to turn too dark.
Once cooled, allow an additional 15–20 minutes for the chocolate topping to set (or pop them in the fridge for faster results).
Tips for Perfect Homemade Chocolate Hobnobs
- Use rolled oats, not quick oats, for the best chewy-crunchy texture.
- Melt the butter and syrup gently—don’t boil it, or it could alter the flavor.
- Let the dough rest for 5–10 minutes before shaping. This helps the oats absorb some moisture, making the dough easier to handle.
- Flatten the dough balls slightly for an even bake and consistent shape.
- Cool completely before adding chocolate or it will melt and slide off.
- Don’t skimp on the chocolate topping—it’s what makes these Hobnobs truly indulgent.
- Store in a single layer or with parchment between layers to keep the chocolate neat and the biscuits crisp.
These tips will help you nail the perfect texture and look of a true, bakery-style Hobnob every time.
Watch Out for These Mistakes While Cooking
Even a simple biscuit like a Hobnob can go sideways with a few common missteps. Here’s what to watch for:
- Using the wrong oats: Quick or instant oats make the dough too soft and ruin the biscuit’s signature texture. Stick with rolled oats.
- Over-melting the butter and syrup: If the mixture gets too hot, it can affect the dough consistency and cause spreading during baking.
- Overmixing the dough: Stir just until combined. Overworking it can lead to tough biscuits.
- Skipping the cooling step: The biscuits need time to firm up. Rushing into the chocolate stage while they’re still warm will lead to a mess.
- Using too much flour: Measure your flour properly (use a kitchen scale or spoon and level). Too much flour can dry out the dough and make crumbly biscuits.
Taking a few extra minutes to avoid these pitfalls makes all the difference in achieving that classic, crunchy Hobnob goodness.
What to Serve With Homemade Chocolate Hobnobs?
These biscuits are delightful on their own but even better with the right pairing. Here are some ideas to complete the moment:
Hot Tea
A classic British pairing—try Earl Grey, English Breakfast, or even a spiced chai. Perfect for dunking.
Coffee or Espresso
The rich chocolate and oaty base pair beautifully with bold coffee notes.
Cold Milk
Old-school and satisfying. The creamy coldness contrasts perfectly with the crisp biscuit.
Vanilla Ice Cream
Crumble a few over a scoop for a quick and easy dessert with crunch.
Greek Yogurt with Berries
Use crumbled Hobnobs as a topping for a semi-healthy snack or breakfast parfait.
Fruit Compote
Warm berries or apple compote adds a nice tart contrast to the sweet biscuit.
Cheese Board Addition
Yes, really! Add Hobnobs to a dessert-style cheese board with brie or sharp cheddar.
Pack in Lunchboxes
They travel well and make a great afternoon pick-me-up for kids or adults.
Storage Instructions
Homemade Chocolate Hobnobs keep beautifully, making them ideal for prepping ahead.
- Room Temperature: Store them in an airtight container at room temperature for up to 7 days. Place parchment paper between layers to prevent the chocolate from sticking.
- Refrigerator: While not necessary, if your kitchen is warm, you can refrigerate them to keep the chocolate firm. Just make sure they’re in a sealed container so they don’t absorb fridge odors.
- Freezer: These biscuits freeze very well. Lay them in a single layer on a baking sheet to freeze initially, then transfer to a freezer-safe container or bag. They’ll last up to 3 months. Thaw at room temperature when ready to enjoy.
Tip: If you know you’ll be freezing them, consider adding the chocolate after thawing for a fresher finish.
Estimated Nutrition
Please note that nutritional values can vary depending on the specific ingredients used (especially chocolate type and portion size), but here’s an approximate breakdown per biscuit:
- Calories: 160
- Fat: 8g
- Saturated Fat: 5g
- Carbohydrates: 20g
- Sugar: 10g
- Fiber: 1g
- Protein: 2g
- Sodium: 90mg
These values are based on a biscuit topped with milk chocolate and made with standard-sized scoops. If you go smaller (or larger), you’ll want to adjust accordingly.
Frequently Asked Questions
How do I keep my Hobnobs crunchy?
Let them cool completely before storing and always keep them in an airtight container. Avoid stacking them while the chocolate is still soft, and don’t store them near moisture or heat.
Can I make these without the chocolate topping?
Absolutely! Traditional Hobnobs come both with and without chocolate. Skipping the topping still results in a delicious, oaty biscuit perfect for tea time.
Is golden syrup necessary?
Golden syrup gives the biscuits that classic, rich sweetness and chewy texture. If you can’t find it, you can substitute with light corn syrup or honey, but the flavor won’t be exactly the same.
Can I use gluten-free oats and flour?
Yes, you can use certified gluten-free rolled oats and a 1:1 gluten-free flour blend. The texture might be slightly different, but they’ll still taste fantastic.
Why did my biscuits spread too much in the oven?
This can happen if the butter mixture was too hot when mixed with the dry ingredients or if the dough was too soft. Let the dough rest 10 minutes before shaping, and chill if needed.
Can I double the batch?
Definitely. Just make sure to bake in batches or use multiple trays so you don’t overcrowd the oven. Double everything—including the chocolate topping!
What type of chocolate is best?
Milk chocolate gives a sweet, creamy finish while dark chocolate adds a richer, slightly bitter contrast. Choose your favorite—or mix them for a marbled look.
Do I need a mixer for this recipe?
Nope! Everything can be mixed by hand. It’s a simple melt-and-mix process that doesn’t require any special equipment beyond a saucepan and a mixing bowl.
Conclusion
Homemade Chocolate Hobnobs are the kind of treat that brings joy in every bite—simple to make, comforting to eat, and perfect for sharing (or not). Whether you’re baking them as a nostalgic nod to the classic British biscuit or discovering them for the first time, these oat-packed, chocolate-topped wonders are sure to earn a permanent spot in your baking rotation.
They’re ideal for quick snacks, sweet lunchbox additions, or elevating your afternoon tea game. Plus, with their long shelf life and freezer-friendly nature, you can enjoy a little biscuit bliss anytime.
Now that you’ve seen how easy and rewarding they are to make, it’s time to grab your oats and get baking!

Homemade Chocolate Hobnobs
- Total Time: 30 minutes
- Yield: 18 biscuits
- Diet: Vegetarian
Description
If you’re looking for a crunchy, chocolatey treat that’s easy to make and completely addictive, Homemade Chocolate Hobnobs are your answer. These oat-based biscuits are a classic British favorite—perfect for dunking, snacking, or gifting. With just a handful of pantry ingredients, you can whip up a batch that rivals the store-bought version. This easy recipe is ideal for quick breakfasts, afternoon snacks, or simple dessert ideas. Whether you enjoy them plain or topped with rich melted chocolate, they’re guaranteed to satisfy your biscuit cravings.
Ingredients
1 cup rolled oats
3/4 cup all-purpose flour
1/2 cup brown sugar
1/2 teaspoon baking soda
1/4 teaspoon salt
1/2 cup unsalted butter
2 tablespoons golden syrup
1 teaspoon vanilla extract
5 ounces milk or dark chocolate (melted for topping)
Instructions
1. Preheat the oven to 350°F (175°C) and line two baking sheets with parchment paper.
2. In a large bowl, mix rolled oats, flour, brown sugar, baking soda, and salt.
3. In a small saucepan, melt the butter and golden syrup over low heat. Remove from heat and stir in vanilla extract.
4. Pour the wet mixture into the dry ingredients and mix until fully combined. Let rest for 5–10 minutes.
5. Scoop tablespoon-sized portions, roll into balls, flatten slightly, and place on the baking sheets spaced apart.
6. Bake for 12–15 minutes until edges are golden and centers are set.
7. Cool on the tray for 5 minutes, then transfer to a wire rack to cool completely.
8. Melt chocolate and spoon onto the tops of each cooled biscuit. Spread evenly and let it set at room temperature (or refrigerate for faster setting).
9. Store in an airtight container at room temperature for up to 7 days or freeze for up to 3 months.
Notes
Let biscuits cool completely before adding chocolate to prevent melting.
Use rolled oats—not quick oats—for the best texture.
To freeze, store in a single layer or separate with parchment paper.
- Prep Time: 15 minutes
- Cook Time: 15 minutes
- Category: Snack / Dessert
- Method: Baking
- Cuisine: British
Nutrition
- Serving Size: 1 biscuit
- Calories: 160
- Sugar: 10g
- Sodium: 90mg
- Fat: 8g
- Saturated Fat: 5g
- Unsaturated Fat: 2g
- Trans Fat: 0g
- Carbohydrates: 20g
- Fiber: 1g
- Protein: 2g
- Cholesterol: 20mg
Keywords: easy recipe, chocolate biscuits, oat cookies, hobnobs, quick breakfast, snack ideas