

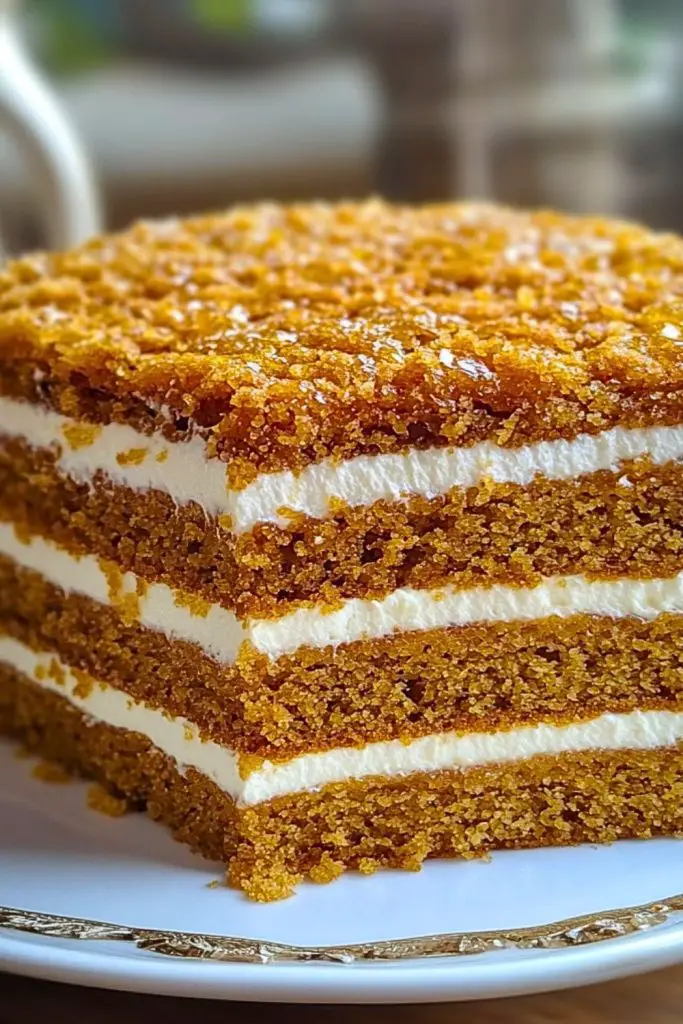
Russian Honey Cake, or Medovik, is one of those timeless desserts that always grabs attention at the table. I remember the first time I tasted it—layer upon layer of tender honey-infused cake, sandwiched with a velvety sour cream filling that just melts into every bite. It’s rich, elegant, and surprisingly light on the palate, despite how indulgent it looks. And yes, it tastes every bit as good as it looks.

What really makes this cake special for me is the balance between the caramelized flavor of the honey and the cool tang of the cream. It takes a little patience to prepare all the thin cake layers and stack them just right, but trust me, it’s worth every minute. It’s the kind of dessert that doesn’t just satisfy your sweet tooth—it impresses. Whether you’re celebrating something or just treating yourself, this cake feels like a reward.
Why You’ll Love This Russian Honey Cake
Medovik isn’t just another layer cake—it’s a showstopper. With its beautifully stacked layers, this dessert looks intricate but is surprisingly easy to pull off. The honey adds warmth and depth, the cream keeps it light, and the texture only improves as it rests in the fridge. Each slice tells a story of old-world tradition meeting modern comfort. Whether you’re new to Eastern European desserts or grew up with them, this cake hits that nostalgic, soul-soothing note.
What Kind of Honey Should I Use?
Choosing the right honey for Russian Honey Cake is key to getting that deep, rich flavor that defines Medovik. I recommend using a dark, robust honey like buckwheat or forest honey if you can find it—these types have a more pronounced flavor and give the cake that classic golden hue and caramelized taste. If you only have access to lighter varieties like clover or acacia, those will work too, but the flavor will be a bit milder and more delicate. Either way, make sure you’re using real, natural honey—none of that processed, syrupy stuff.
Options for Substitutions
Life happens, and sometimes you need to swap ingredients. Luckily, Russian Honey Cake is quite forgiving with a few smart substitutions:
- Honey Substitute: If you’re out of honey, try maple syrup or golden syrup. The flavor will be different, but still rich and sweet enough to complement the cream filling.
- Sour Cream Filling: You can swap sour cream with Greek yogurt for a lighter touch or mascarpone if you want it richer and creamier.
- Flour Alternatives: All-purpose flour is traditional, but cake flour can be used if you’re aiming for a softer texture. Avoid whole wheat—it’ll overpower the delicate balance.
- Butter Options: Unsalted butter is ideal. If using salted butter, just skip any extra salt the recipe might call for.
- Add-Ons: Want to elevate it? Add a bit of orange zest or cinnamon to the batter. Or throw in crushed nuts between layers for texture.
These swaps won’t ruin the integrity of the cake—they might even give it your own personal twist.
Ingredients for This Russian Honey Cake
Each ingredient in Medovik plays an essential role in building the cake’s flavor, texture, and structure. Here’s what you’ll need and why it matters:
- Honey: The heart of the recipe. It adds sweetness, warmth, and a rich aroma that gives the cake its signature character.
- Granulated Sugar: Works with the honey to sweeten the dough and helps caramelize the cake layers during baking.
- Eggs: Provide structure and richness. They bind the dough and help it bake into sturdy but tender layers.
- Butter: Adds richness and softness to the cake layers, giving them a tender, melt-in-the-mouth quality.
- All-Purpose Flour: The main dry ingredient that builds the structure of each layer. It needs to be strong enough to hold the stack while staying soft after refrigeration.
- Baking Soda: Reacts with the honey and heat to give the dough a bit of rise and a slight chewiness.
- Salt: Just a pinch enhances all the other flavors and balances the sweetness.
- Sour Cream: The base of the creamy filling. Its slight tang perfectly offsets the sweet honey cake, making the whole dessert feel balanced and not overly rich.
- Powdered Sugar: Sweetens the sour cream filling while maintaining a smooth texture that spreads easily between layers.
Every component has its purpose—this isn’t a recipe where anything feels optional. Together, these ingredients create a beautifully layered, flavor-packed cake that only gets better with time.
Step 1: Make the Honey Dough
Start by preparing a double boiler setup. In a heatproof bowl over simmering water, combine honey, sugar, and butter. Stir gently until the butter melts and the mixture becomes smooth and slightly foamy. Add in the baking soda—watch it foam up! Stir for another minute until it deepens in color. Remove from heat and let it cool slightly.
Once it’s cooled down a bit (but still warm), whisk in the eggs one at a time until fully incorporated.
Step 2: Add the Flour
Gradually mix in the flour, starting with a spatula and switching to your hands when it becomes too thick to stir. Knead just until the dough comes together—don’t overwork it. It should be soft, warm, and a bit tacky. Divide it into 8 equal pieces, roll each into a ball, and cover with a towel.
Step 3: Roll Out and Bake the Layers
Preheat your oven to 350°F (175°C). Roll each dough ball into a thin round—about 1/8 inch thick. Use an 8-inch cake pan or plate as a template to trim perfect circles (save the trimmings!). Bake each layer on parchment paper for 5–7 minutes until golden and slightly puffed. Cool completely on a wire rack.
Now take those leftover trimmings and bake them too—they’ll become golden and crisp. Crush them into fine crumbs for decorating later.
Step 4: Make the Filling
Whisk together the sour cream and powdered sugar until smooth and fluffy. The filling should be light, slightly sweet, and spreadable.
Step 5: Assemble the Cake
Place one cake layer on your serving plate. Spread a generous layer of cream filling over the top, all the way to the edges. Repeat with remaining layers. Once stacked, spread the cream over the top and sides of the cake too.
Sprinkle the crushed cake trimmings all over the top and sides. Press gently to make them stick—it gives the cake that rustic, irresistible finish.
Step 6: Let It Rest
This cake must chill. Cover it and refrigerate for at least 8 hours (overnight is better). During this time, the layers soak in the filling and become soft, tender, and perfectly sliceable.
How Long to Cook the Russian Honey Cake
The baking itself is fairly quick—each thin cake layer takes only 5 to 7 minutes in a preheated oven at 350°F (175°C). Since you’re baking 8 layers individually, budget about 45 minutes to 1 hour just for baking.
Once assembled, the most important “cooking” phase happens in the fridge. The fully assembled cake should rest for at least 8 hours, preferably overnight. This chill time allows the sour cream filling to soak into the cake layers, transforming them from crisp to decadently tender.
Tips for Perfect Russian Honey Cake
- Use a Double Boiler for the Dough: Heating the honey, sugar, and butter gently helps deepen the flavor without burning. Don’t skip this step—it’s part of what makes Medovik so unique.
- Work Fast While the Dough is Warm: The dough is easiest to roll out while still slightly warm. Once it cools, it becomes firmer and more resistant to shaping.
- Trim Layers for a Clean Finish: After baking, you can stack all layers and trim the edges with a sharp knife for perfect alignment (totally optional but makes a stunning final presentation).
- Don’t Overbake: Keep an eye on each layer—they’re thin and can go from golden to overdone quickly. You want light browning, not deep crispiness.
- Chill Time is Essential: It might be tempting to dig in early, but resting the cake is what makes it soft and luscious. Letting it sit overnight is non-negotiable for best results.
- Even Out the Filling: Use a small offset spatula to spread the filling evenly—it prevents sliding and ensures uniform layers.
- Decorate with Crumbs Generously: The crushed layer trimmings don’t just make it pretty—they also help hide any frosting imperfections on the sides.
- Serve Chilled: Slice the cake cold for clean cuts, then let it sit at room temp for 10–15 minutes before serving to enhance the flavor.
Watch Out for These Mistakes While Cooking
Even though Russian Honey Cake is surprisingly forgiving, there are a few missteps that can sneak up on you. Here’s what to avoid:
- Skipping the Chill Time: This one’s big. If you slice too early, you’ll get dry, brittle layers instead of the soft, melt-in-your-mouth texture. Patience pays off here.
- Burning the Honey Mixture: Heat the honey gently. If it gets too hot or scorches, it’ll turn bitter and ruin the cake’s signature taste.
- Overbaking the Layers: Since they’re thin, they cook fast. Keep a close eye—5 to 7 minutes is all you need. Too long and they’ll be stiff, not soft.
- Too Much Flour: It’s easy to over-flour the dough, especially when rolling. Use just enough to prevent sticking. Too much makes the cake dense.
- Uneven Rolling: If some layers are thicker than others, your stack can look lopsided or collapse. Try to roll them evenly and use a template if needed.
- Overworking the Dough: Once the flour goes in, mix just until combined. Overmixing can lead to tough layers.
- Using Cold Filling: Make sure your sour cream mixture is at room temp when assembling—it spreads smoother and won’t stiffen up your layers.
- Rushing the Assembly: Take your time stacking and spreading. Uneven layers lead to wobbly cakes and poor flavor distribution.
What to Serve With Russian Honey Cake?
Medovik is rich and luscious, but it pairs beautifully with a variety of drinks and light accompaniments. Here are some lovely ideas:
1. Hot Black Tea
A classic pairing. The robust, slightly bitter edge of black tea balances out the cake’s sweetness.
2. Fresh Berries
Serve a small bowl of raspberries, strawberries, or blueberries on the side. Their tartness contrasts beautifully with the creamy filling.
3. Espresso or Strong Coffee
A rich slice and a sharp shot of espresso? Yes, please. It’s bold, refined, and brings out the deeper notes of honey.
4. Sparkling Water with Lemon
Simple but refreshing. A bubbly sip between bites helps cleanse the palate and keeps things light.
5. Chilled Moscato or Dessert Wine
The cake’s soft, sweet layers go wonderfully with a chilled, slightly sweet white wine.
6. Whipped Cream or Crème Fraîche
If you want extra decadence, a small dollop on the side adds a creamy contrast—especially with tart fruits.
7. Mint Tea
Soothing and aromatic, mint tea cools the palate and complements the honey flavor nicely.
8. Vanilla Ice Cream
For those who want the ultimate indulgence, a small scoop of vanilla adds creaminess and contrast in temperature.
Storage Instructions
One of the best things about Russian Honey Cake is that it actually gets better with time. The layers soften, the flavors deepen, and the texture becomes even dreamier after a day or two.
- Refrigerator: Store the assembled cake covered in the fridge for up to 5 days. Use a cake dome or gently wrap it with plastic wrap to keep it from drying out or absorbing fridge odors.
- Freezer: Yes, you can freeze it! Slice the cake first, then wrap individual pieces in plastic wrap and place them in an airtight container. Freeze for up to 2 months. Thaw overnight in the refrigerator before serving.
- Make-Ahead Tip: You can bake the cake layers a day or two ahead and keep them at room temperature in an airtight container. Assemble the cake when you’re ready.
The longer it rests (within reason), the better the cake becomes—this is a rare dessert where day two or three might be even more magical than day one.
Estimated Nutrition
Keep in mind that these numbers are approximate and can vary depending on portion size and exact ingredients used:
Per Slice (based on 12 slices):
- Calories: ~420
- Fat: ~24g
- Saturated Fat: ~14g
- Carbohydrates: ~45g
- Sugar: ~27g
- Protein: ~6g
- Fiber: ~1g
- Cholesterol: ~95mg
- Sodium: ~180mg
Medovik is rich, no doubt, but it’s meant to be a treat. It’s not about cutting corners—it’s about savoring each luxurious bite.
Frequently Asked Questions
1. Can I make Russian Honey Cake ahead of time?
Absolutely—and you should! This cake tastes even better the next day. Just assemble it, cover, and refrigerate overnight. The layers soften and the flavors meld beautifully.
2. What if I don’t have a round cake cutter or pan for shaping the layers?
No problem. Use a bowl, plate, or even a pot lid as a template. Just place it over your rolled-out dough and cut around it with a sharp knife or pizza cutter.
3. Do I have to use sour cream in the filling?
Traditional Medovik uses sour cream, but you can swap it with Greek yogurt, mascarpone, or a combination of whipped cream and cream cheese for a slightly different flavor and texture.
4. Why did my cake layers come out too hard?
Most likely they were overbaked or rolled too thin. Remember, 5–7 minutes is enough, and the chill time in the fridge will naturally soften the layers.
5. How do I get clean slices?
Chill the cake thoroughly before slicing. Use a long, sharp knife dipped in hot water and wiped dry between cuts for those neat bakery-style slices.
6. Can I flavor the filling?
Yes! A little vanilla extract, citrus zest, or even a spoonful of honey added to the filling can enhance the overall flavor. Just don’t overdo it—simplicity is key.
7. Can I make a gluten-free version?
You can try using a 1:1 gluten-free flour blend designed for baking. The texture may change slightly, but the flavor will still be lovely.
8. How many layers can I make?
Traditionally, Medovik has 8 layers, but you can go up to 10 if you’re feeling ambitious. Just roll the dough a bit thinner and reduce baking time slightly.
Conclusion
Russian Honey Cake is more than just a dessert—it’s a piece of culinary history wrapped in tender layers and creamy bliss. Making it is a rewarding process, one that invites you to slow down and enjoy every step. From the rich aroma of honey bubbling over gentle heat to that first soft, tangy-sweet bite, Medovik delivers a full sensory experience.
It’s elegant enough for a celebration, yet humble enough to enjoy with a cup of tea on a quiet afternoon. Whether you’re baking it for the first time or passing down a family tradition, this cake has a way of leaving a lasting impression. Trust me—it’s the kind of dessert people remember.
Delicious Russian Honey Cake Recipe
- Total Time: 9 hours 40 minutes
- Yield: 12 slices
Description
If you’re searching for a cake that delivers both elegance and comfort, Russian Honey Cake (Medovik) is a dream come true. This classic Eastern European dessert features delicate layers of honey-infused cake, each one smoothed with tangy sour cream filling that transforms it into a rich, creamy masterpiece. Perfect for a special occasion or a cozy afternoon, this cake gets better with time as the flavors deepen and the texture softens. Whether you’re exploring new baking traditions or looking for easy dessert ideas that wow, Medovik is a stunning choice—both delicious and rewarding.
Ingredients
- 1/2 cup (170g) honey
- 3/4 cup (150g) granulated sugar
- 1/2 cup (115g) unsalted butter
- 1 teaspoon baking soda
- 3 large eggs
- 3 1/2 cups (440g) all-purpose flour
- Pinch of salt
- 4 cups (900g) sour cream (full fat preferred)
- 1 1/4 cups (150g) powdered sugar
Instructions
- In a heatproof bowl over simmering water, melt honey, sugar, and butter until smooth. Stir in baking soda and cook for 1–2 minutes until foamy and golden. Remove from heat.
- Allow the mixture to cool slightly, then whisk in eggs one at a time until fully incorporated.
- Mix in the flour and salt gradually to form a soft dough. Divide into 8 equal parts.
- Preheat oven to 350°F (175°C). Roll each dough ball into a thin circle, about 8 inches wide. Trim using a round template. Bake each for 5–7 minutes until golden.
- Cool all layers and bake leftover trimmings—then crush into fine crumbs for decorating.
- In a bowl, whisk sour cream and powdered sugar until smooth.
- Assemble the cake: layer cake rounds with sour cream filling. Spread filling on top and sides.
- Coat the cake with crushed crumbs. Refrigerate for at least 8 hours or overnight.
- Prep Time: 40 minutes
- Chill Time: 8 hours
- Cook Time: 1 hour