

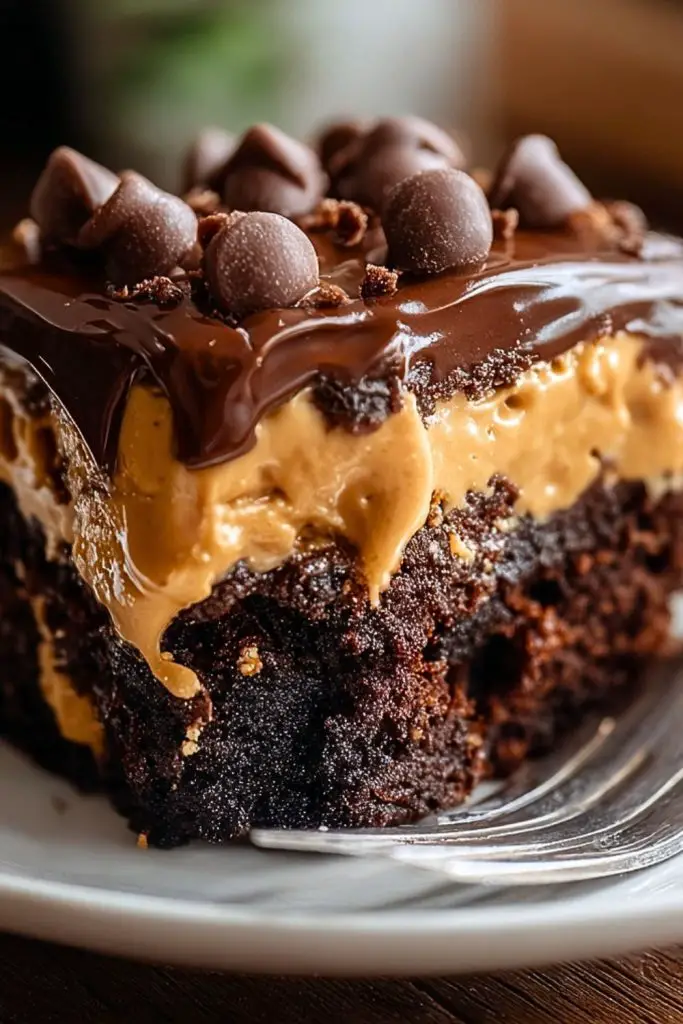
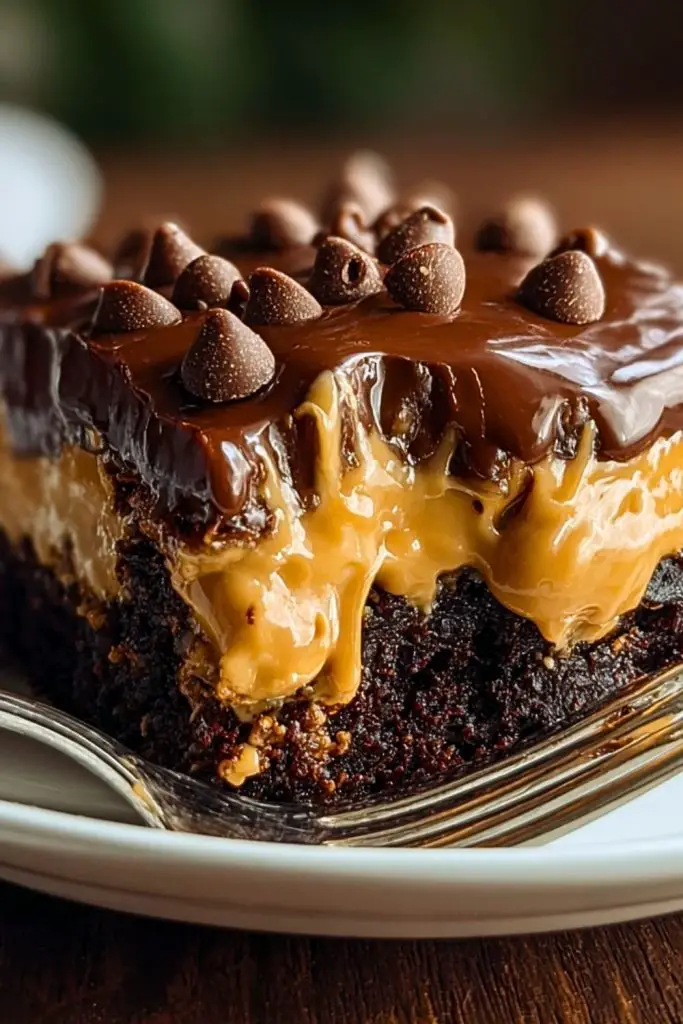
This Chocolate Peanut Butter Poke Cake is a dream dessert for peanut butter cup lovers. Imagine ultra-moist chocolate cake drenched with rich peanut butter sauce, topped with a fluffy peanut butter mousse, and finished with a drizzle of caramel and a generous shower of chopped peanut butter cups. It’s indulgent, it’s gooey, and it delivers the perfect balance of salty-sweet flavors in every bite. The textures—fudgy cake, creamy topping, and crunchy candy bits—keep your spoon coming back for more.
Whether you’re making it for a holiday, potluck, or just to treat yourself on a weekend, this cake promises to steal the show. It’s one of those no-fuss, crowd-pleasing recipes that looks impressive without requiring bakery-level skills. Serve it chilled for the ultimate creamy delight, and prepare for compliments to pour in from every direction.
Why You’ll Love This Chocolate Peanut Butter Poke Cake
- Irresistibly Decadent: Every layer—from the rich chocolate base to the peanut butter topping—is packed with flavor and texture.
- No Mixer Required: Easy steps and simple ingredients make this an approachable dessert for all baking levels.
- Perfect Make-Ahead Treat: This cake actually gets better after chilling, making it ideal for preparing the day before a big event.
- Customizable: Add extra toppings like chocolate chips, crushed pretzels, or even a swirl of ganache to make it your own.
Preparation Phase & Tools to Use (Essential Tools and Equipment, and the Importance of Each Tool)
Before diving into this luscious dessert, it helps to be prepared with the right tools. Here’s what you’ll need and why each is essential for success:
- 9×13-Inch Baking Dish: The base for your poke cake. It holds everything in layers and ensures even baking and chilling.
- Wooden Spoon or Poke Tool: You’ll need this to poke holes in the cake after baking, so the peanut butter sauce seeps in beautifully.
- Medium Saucepan: Used to gently warm the peanut butter sauce so it pours easily into the cake.
- Mixing Bowls (Medium and Large): One for preparing the mousse, another for combining your whipped topping with peanut butter and other mix-ins.
- Whisk or Hand Mixer: For blending the mousse to a smooth, airy consistency. A hand mixer will make things quicker and fluffier.
- Offset Spatula or Spreader: Helps to evenly smooth the mousse and caramel topping over the cake.
- Refrigerator Space: This dessert needs chilling time. Make sure you have space to let the flavors meld and the layers set.
Preparation Tips
To get the most out of this dessert and avoid any hiccups along the way, follow these helpful tips:
- Let the Cake Cool Before Poking: Warm cake can tear and collapse. Let it cool slightly so it holds up while you poke holes.
- Use a Thick Peanut Butter Sauce: You want it pourable, not runny, so it doesn’t just pool at the bottom but seeps slowly into the cake.
- Don’t Overmix the Mousse: Whip it until light and fluffy, but avoid overmixing so it doesn’t deflate.
- Chill for Best Texture: This cake tastes better after at least 4 hours in the fridge. Overnight is even better.
- Use Mini Peanut Butter Cups for Garnish: They offer bite-sized bursts of flavor and make for a beautiful topping.
Ingredients for This Chocolate Peanut Butter Poke Cake
Here’s everything you’ll need to create this irresistible dessert. Each ingredient plays a role in delivering that signature chocolate-peanut butter harmony:
For the Cake:
- 1 box chocolate cake mix (plus required eggs, oil, and water per package instructions)
- Non-stick spray or butter (for greasing the baking dish)
For the Peanut Butter Filling:
- 1 cup creamy peanut butter
- 1 (14 oz) can sweetened condensed milk
- 1/2 cup whole milk (or heavy cream for extra richness)
- 1 tsp vanilla extract
For the Peanut Butter Mousse Topping:
- 1 (8 oz) block cream cheese, softened
- 1 cup powdered sugar
- 1/2 cup creamy peanut butter
- 1 tsp vanilla extract
- 1 (8 oz) tub whipped topping (like Cool Whip), thawed
For the Toppings:
- 1/2 cup caramel sauce (store-bought or homemade)
- 1 to 1½ cups mini peanut butter cups, halved or chopped
- Crushed peanuts or crushed graham crackers (optional, for added crunch)
Feel free to adjust the toppings to suit your sweet tooth or create a custom look and texture.
Step 1: Bake the Chocolate Cake
Prepare the chocolate cake mix according to the package directions. Pour the batter into a greased 9×13-inch baking dish and bake as directed. Once done, remove from the oven and allow it to cool for about 15–20 minutes.
Step 2: Poke the Cake
Using the handle of a wooden spoon (or something similar), poke holes all over the surface of the cake. Space them about an inch apart, and make sure you go deep enough for the filling to seep through.
Step 3: Make the Peanut Butter Filling
In a medium saucepan over low heat, stir together the peanut butter, sweetened condensed milk, whole milk, and vanilla extract. Heat until smooth and just pourable, then remove from the heat.
Step 4: Pour Filling Into the Holes
Slowly pour the warm peanut butter mixture over the poked cake, letting it fill the holes. Use a spatula to spread it evenly. Let the cake cool completely at room temperature, then transfer it to the fridge to chill for at least 1 hour.
Step 5: Prepare the Peanut Butter Mousse
In a large bowl, beat the softened cream cheese with powdered sugar until smooth. Add peanut butter and vanilla extract, mixing until creamy. Fold in the whipped topping gently until well combined and fluffy.
Step 6: Add the Mousse Layer
Spread the peanut butter mousse over the chilled cake, smoothing it out with a spatula. Make sure to cover all edges evenly.
Step 7: Add Toppings
Drizzle caramel sauce over the mousse layer, then sprinkle chopped mini peanut butter cups generously on top. Add any optional toppings like crushed peanuts or graham cracker crumbs for extra texture.
Step 8: Chill and Serve
Refrigerate the completed cake for at least 3–4 hours, or overnight if possible. This allows all the flavors to settle and the mousse to firm up. Slice and serve cold for the best experience.
Notes
- Make Ahead: This cake is an excellent make-ahead dessert. In fact, letting it chill overnight improves the flavor and texture.
- Custom Toppings: Swap mini peanut butter cups with chopped Reese’s Pieces, chocolate chips, or even pretzel bits for a salty crunch.
- Whipped Topping Substitute: If you prefer homemade whipped cream over store-bought topping, whip 1 cup of heavy cream with 2 tablespoons of powdered sugar until stiff peaks form.
- Double the Caramel: For extra gooeyness, double the caramel drizzle just before serving.
- Freezer-Friendly: You can freeze this cake after assembling—just skip the peanut butter cup topping until after thawing.
Watch Out for These Mistakes While Cooking
- Not Letting the Cake Cool Before Poking: If the cake is too hot, the holes may collapse or tear the cake, making the filling absorb unevenly.
- Overheating the Peanut Butter Sauce: This can cause it to seize or become too thick to pour. Warm it gently until just pourable.
- Skipping the Chill Time: The cake needs to be chilled to set the mousse properly and develop its full flavor.
- Using Low-Quality Peanut Butter: Natural peanut butters with oil separation may not mix well for the filling or mousse. Use a smooth, shelf-stable type.
- Overmixing the Mousse Layer: Stirring too much after adding the whipped topping can deflate the mousse and make it dense rather than light and airy.
- Uneven Topping Distribution: Try to spread toppings out evenly for both flavor and visual appeal.
- Serving It Too Soon: If not fully chilled, the mousse may be too soft and the filling won’t be absorbed as thoroughly.
- Overcrowding the Toppings: Too many toppings can overpower the mousse layer and make slicing messy.
What to Serve With Chocolate Peanut Butter Poke Cake?
This rich and indulgent dessert pairs beautifully with lighter, refreshing sides or complementary treats to balance its bold flavors. Here’s what you can serve alongside it:
8 Recommendations
- Fresh Berries
Strawberries, raspberries, or blueberries offer a tart contrast that cuts through the cake’s richness. - Vanilla Ice Cream
A scoop on the side creates a classic dessert combo, adding creamy chill to every bite. - Espresso or Strong Coffee
The bitterness of coffee balances the sweet peanut butter and chocolate beautifully. - Whipped Cream Topped with Cinnamon
A light, airy dollop adds creaminess without overwhelming the cake. - Mint Tea
Refreshing and herbal, it cleanses the palate between bites. - Salted Pretzel Rods or Chips
For a salty-sweet contrast, offer these on the side for guests to dip or crunch between bites. - Banana Slices
Fresh banana rounds add fruitiness and a soft texture that pairs well with peanut butter. - Milk or Chocolate Milk
Keep it kid-friendly and nostalgic with a cold glass of milk to round out the dessert experience.
Storage Instructions
Proper storage ensures your Chocolate Peanut Butter Poke Cake stays fresh and delicious:
- Refrigeration: Always store this cake in the refrigerator due to its mousse topping and dairy components. Cover tightly with plastic wrap or a lid and refrigerate for up to 5 days.
- Freezing: You can freeze the cake without the peanut butter cups on top. Wrap individual slices or the entire cake in plastic wrap and foil, then freeze for up to 2 months. Thaw in the fridge overnight before serving. Add the candy topping just before serving for best texture.
Estimated Nutrition (Per Serving – based on 16 servings)
Please note these are approximate values and may vary based on exact ingredients used:
- Calories: 420
- Total Fat: 24g
- Saturated Fat: 9g
- Cholesterol: 35mg
- Sodium: 330mg
- Carbohydrates: 46g
- Sugar: 34g
- Protein: 6g
- Fiber: 2g
This dessert is indulgent—enjoy it as a special treat, balanced with lighter meals throughout your day.
Frequently Asked Questions
1. Can I use homemade chocolate cake instead of boxed mix?
Absolutely! A homemade chocolate cake works just as well. Just be sure to bake it in a 9×13-inch pan and let it cool slightly before poking the holes.
2. Is it okay to use natural peanut butter?
It’s not recommended. Natural peanut butters tend to separate and may not blend smoothly for the filling or mousse. Stick to creamy, shelf-stable peanut butter for best results.
3. Can I make this cake gluten-free?
Yes. Use a gluten-free chocolate cake mix and verify that your other ingredients, like caramel and peanut butter, are gluten-free as well.
4. Can I prepare this cake a day in advance?
Yes, in fact it’s better when made a day ahead. It gives the flavors time to meld and the mousse layer to set perfectly.
5. What if I don’t have a hand mixer?
You can mix everything by hand using a sturdy whisk. It might take a bit more effort, but it will still turn out delicious.
6. Can I substitute whipped topping with real whipped cream?
Definitely. Just whip 1 cup of cold heavy cream with a couple tablespoons of powdered sugar until stiff peaks form, then use in place of the store-bought version.
7. Do I have to use caramel sauce on top?
Not at all. While it adds a lovely finish, you can skip it or replace it with a chocolate drizzle, fudge sauce, or even crushed toffee bits.
8. How long should I chill the cake before serving?
Let it chill for at least 3–4 hours, but overnight is ideal for best texture and flavor development.
Conclusion
Chocolate Peanut Butter Poke Cake is one of those effortlessly impressive desserts that delights everyone who tries it. With its layered richness, creamy peanut butter mousse, and crunchy candy topping, it’s a full-sensory treat. Whether you’re baking for a gathering or a solo indulgence, this cake delivers on taste, texture, and crowd-pleasing charm. Prepare it ahead, let it chill, and enjoy every forkful of this decadent masterpiece.
Chocolate Peanut Butter Poke Cake
- Total Time: 4 hours 30 minutes
- Yield: 16 servings
Description
This Chocolate Peanut Butter Poke Cake is a rich, creamy dessert featuring a moist chocolate cake soaked in a peanut butter filling, topped with a fluffy peanut butter mousse, caramel drizzle, and chopped mini peanut butter cups. It’s the perfect make-ahead dessert for gatherings or indulgent weeknight treats.
Ingredients
For the Cake:
- 1 box chocolate cake mix (plus ingredients listed on box)
- Non-stick spray or butter (for greasing)
For the Peanut Butter Filling:
- 1 cup creamy peanut butter
- 1 (14 oz) can sweetened condensed milk
- 1/2 cup whole milk or heavy cream
- 1 tsp vanilla extract
For the Mousse Topping:
- 1 (8 oz) block cream cheese, softened
- 1 cup powdered sugar
- 1/2 cup creamy peanut butter
- 1 tsp vanilla extract
- 1 (8 oz) tub whipped topping (Cool Whip), thawed
For the Toppings:
- 1/2 cup caramel sauce
- 1 to 1½ cups mini peanut butter cups, chopped
Instructions
- Preheat oven and prepare chocolate cake according to package directions in a 9×13-inch pan.
- Let cake cool for 15–20 minutes. Poke holes over the surface using a wooden spoon handle.
- Warm peanut butter, sweetened condensed milk, whole milk, and vanilla extract in a saucepan until smooth and pourable.
- Pour filling over poked cake, ensuring it seeps into holes. Spread evenly and chill for at least 1 hour.
- Beat cream cheese with powdered sugar until smooth. Mix in peanut butter and vanilla.
- Fold in whipped topping gently to form the mousse.
- Spread mousse evenly over the chilled cake.
- Drizzle with caramel sauce and sprinkle with chopped peanut butter cups.
- Refrigerate for 3–4 hours or overnight before serving.
- Prep Time: 30 minutes
- Chill Time: 4 hours