

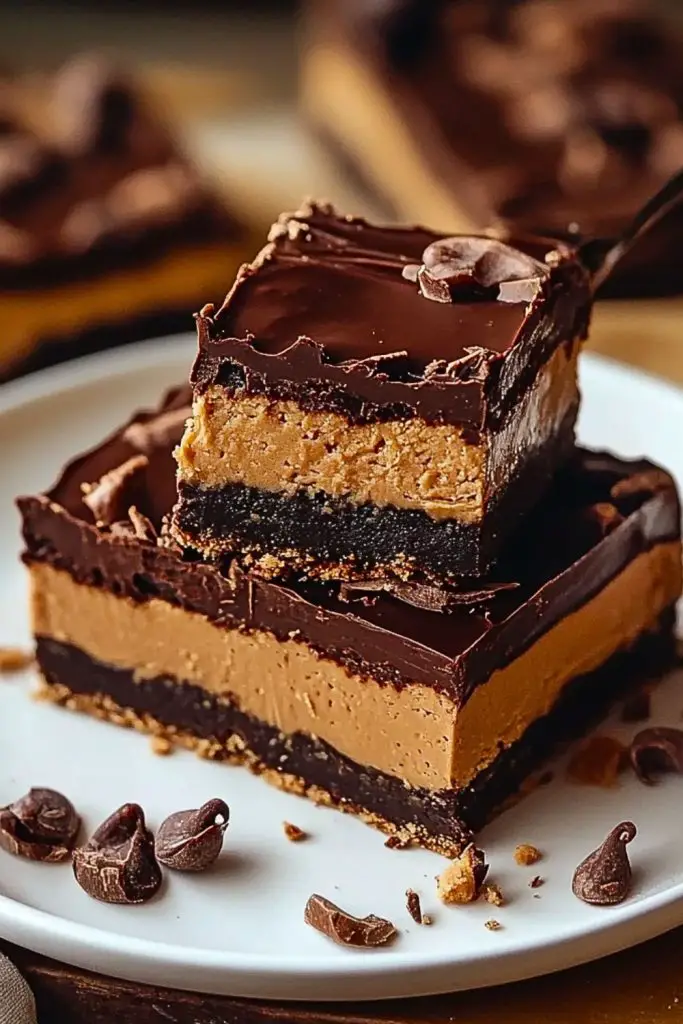
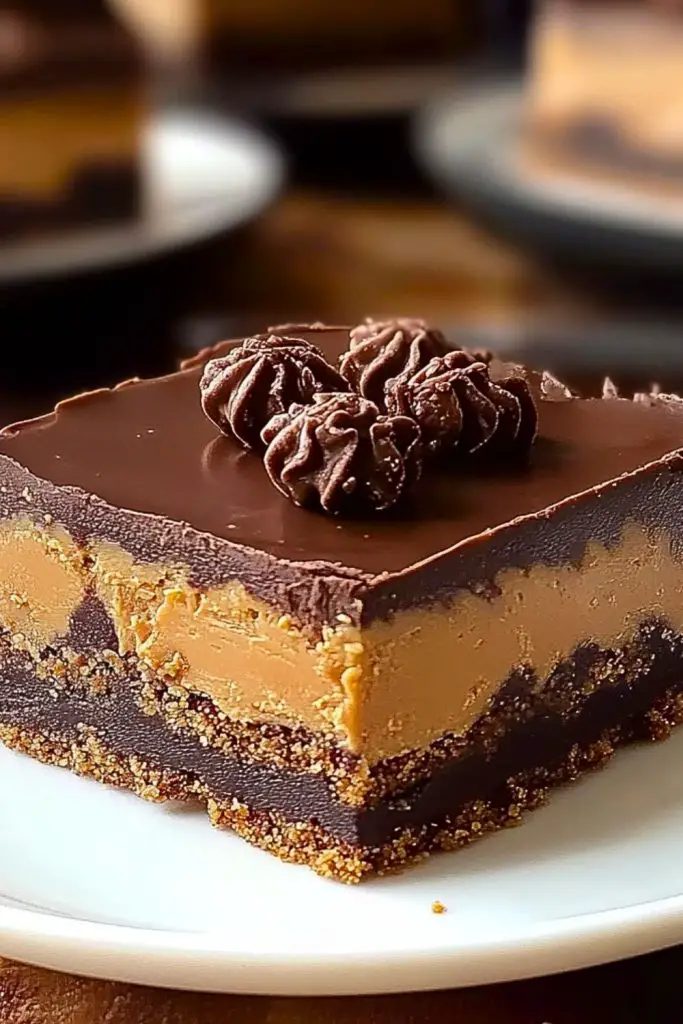
Decadent, rich, and irresistibly creamy—Chocolate Peanut Butter Dream Bars are every dessert lover’s fantasy. Imagine a luscious peanut butter filling layered over a chocolate cookie crust, topped with a silky smooth ganache that glistens under soft lighting. One bite is all it takes to transport you into a world where creamy meets crunchy, and salty meets sweet in perfect harmony.
These bars are perfect for parties, potlucks, or simply indulging yourself on a quiet evening at home. Whether you’re a die-hard peanut butter fan or just someone who appreciates the art of dessert layering, these dreamy bars are a sure-fire way to impress. No baking is required, and the texture payoff is out of this world.
Why You’ll Love This Chocolate Peanut Butter Dream Bars Recipe
- Effortless Yet Impressive: These no-bake bars look bakery-worthy but are surprisingly simple to make.
- Perfect Texture Trio: Crunchy base, creamy middle, glossy top—each layer brings something special.
- Make-Ahead Friendly: They chill beautifully and taste even better the next day.
- Crowd-Pleasing Flavor: The combo of chocolate and peanut butter is a timeless classic that appeals to everyone.
- Customizable: Add crushed pretzels, sea salt, or even a hint of espresso powder for your own twist.
Preparation Phase & Tools to Use for Chocolate Peanut Butter Dream Bars
Creating the perfect Chocolate Peanut Butter Dream Bars starts with a smooth workflow and the right tools. While the recipe is straightforward, having these essentials on hand will elevate both ease and quality.
Essential Tools and Equipment:
- Food Processor or Blender: Crucial for pulsing the chocolate cookie crust to a fine, even consistency.
- Mixing Bowls (at least two): You’ll need one for the crust mixture and another for the peanut butter filling.
- Spatula: Indispensable for smooth spreading, especially when layering the peanut butter and ganache.
- 8×8 or 9×9-inch Baking Dish: The ideal size for even layering and clean slicing.
- Parchment Paper: Helps lift out the bars effortlessly from the dish without sticking or breaking.
- Microwave-Safe Bowl: For melting chocolate and butter together without scorching.
- Measuring Cups & Spoons: Accuracy matters—especially with peanut butter and powdered sugar proportions.
- Electric Mixer or Hand Whisk: Ensures a light, creamy peanut butter layer free of lumps.
These tools simplify the process and help achieve a professional-looking finish without the fuss.
Preparation Tips
- Room Temperature Ingredients: Make sure butter and peanut butter are at room temp to mix smoothly.
- Chill Between Layers: Let each layer set in the fridge for at least 20–30 minutes before adding the next to maintain clean, distinct layers.
- Don’t Skip the Parchment Paper: It’s the secret to lifting out the bars without a mess.
- Use Creamy Peanut Butter: Natural peanut butters tend to separate and can affect the consistency of the filling.
- Level the Layers: Use the back of a spoon or offset spatula to press and level each layer for that perfect square-cut finish.
Ingredients for this Chocolate Peanut Butter Dream Bars Recipe
Each layer of these bars brings its own bold flavor and silky texture. Here’s everything you’ll need to build the ultimate no-bake dessert.
For the Chocolate Cookie Crust:
- 2 cups chocolate cookie crumbs (such as Oreos, finely crushed)
- ½ cup unsalted butter, melted
For the Peanut Butter Filling:
- 1 cup creamy peanut butter (not natural)
- ½ cup unsalted butter, softened
- 1¾ cups powdered sugar, sifted
- 1 teaspoon vanilla extract
- Pinch of salt (optional, enhances the peanut flavor)
For the Chocolate Ganache Topping:
- 1½ cups semi-sweet chocolate chips
- ½ cup heavy cream
- 1 tablespoon unsalted butter (adds a glossy finish)
Optional Garnish:
- Chocolate shavings
- Crushed peanuts
- Sea salt flakes
- Mini peanut butter cups (chopped)
Step-by-Step Instructions to Make Chocolate Peanut Butter Dream Bars
Now let’s bring these dreamy bars to life! This no-bake recipe is all about layering rich textures and flavors in a few simple stages. Make sure each layer chills properly before adding the next to get that clean, professional look.
Step 1: Make the Chocolate Cookie Crust
- Add chocolate cookies to a food processor and pulse until finely crushed.
- Pour in the melted butter and pulse again until the mixture resembles wet sand.
- Press the crust evenly into a parchment-lined 8×8 or 9×9 inch pan. Use the back of a spoon or a flat-bottomed glass to compact it tightly.
- Refrigerate for 15–20 minutes until firm.
Step 2: Prepare the Peanut Butter Filling
- In a medium mixing bowl, beat together the peanut butter and softened butter until smooth and fluffy.
- Gradually add powdered sugar, beating until fully incorporated.
- Mix in vanilla extract and a pinch of salt (if using).
- Spread the peanut butter layer evenly over the chilled crust using a spatula. Smooth the top as much as possible.
- Chill again for 20–30 minutes to firm up.
Step 3: Make the Ganache Topping
- In a microwave-safe bowl, combine chocolate chips, heavy cream, and 1 tablespoon of butter.
- Microwave in 20-second intervals, stirring each time, until smooth and glossy.
- Pour the ganache over the chilled peanut butter layer and spread evenly with a spatula.
Step 4: Final Chill and Serve
- Cover the pan with plastic wrap and refrigerate for at least 2 hours (or until fully set).
- Once chilled, lift out the slab using the parchment paper, and cut into clean squares using a sharp knife.
- Optionally, garnish with extra melted chocolate, chopped nuts, or sea salt flakes before serving.
Notes
Chocolate Peanut Butter Dream Bars are incredibly forgiving, but a few thoughtful tips can take them from great to unforgettable:
- No-Bake Perfection: This dessert doesn’t touch the oven, making it ideal for hot days or quick prep.
- Use Quality Ingredients: Choose good-quality chocolate chips and creamy peanut butter—those flavors are front and center.
- Make-Ahead Friendly: These bars store beautifully in the fridge, and the texture even improves after resting overnight.
- Versatile Garnish Options: Elevate the visual appeal with swirls of chocolate, a sprinkle of sea salt, or chopped mini peanut butter cups on top.
- Vegan/Dairy-Free Options: Use plant-based butter and dairy-free chocolate/cream alternatives to adapt the recipe to dietary needs.
Watch Out for These Mistakes While Cooking
Even easy recipes have their pitfalls. Avoid these common slip-ups for dreamy results every time:
- Using Natural Peanut Butter: It tends to separate and won’t hold the structure well. Stick to standard creamy peanut butter.
- Skipping the Chill Time: Each layer needs time to set. Rushing can cause layers to blend or become too soft to cut cleanly.
- Overheating the Ganache: High heat can scorch the chocolate. Melt slowly using short microwave bursts or a double boiler.
- Not Compacting the Crust Enough: A loose crust will crumble. Firm pressure ensures it holds up under the creamy layers.
- Cutting Too Soon: Let the bars chill fully before slicing, or you risk messy, uneven squares.
- Using Warm Tools: Always use a clean, cool knife for slicing. You can even chill the knife for precision.
- Skipping the Parchment Paper: Makes removal tricky and can cause breakage.
- Too Much Powdered Sugar: Adding too much can make the peanut butter filling stiff and overly sweet. Measure accurately and taste as you go.
What to Serve With Chocolate Peanut Butter Dream Bars?
Chocolate Peanut Butter Dream Bars are decadent on their own, but pairing them with the right accompaniments can take your dessert spread to a whole new level. Whether you’re planning a party or just enhancing your personal indulgence, these pairings bring balance and contrast to the richness of the bars.
8 Delicious Recommendations:
- Cold Brew Coffee or Espresso
The bitterness of coffee beautifully offsets the sweetness and richness of the bars, making each bite more intense and enjoyable. - Fresh Berries
Strawberries, raspberries, or blueberries add a burst of freshness and a slight tartness that complements the creamy peanut butter filling. - Vanilla Ice Cream
A scoop on the side cools and lightens up the richness, creating a classic combo reminiscent of a sundae bar. - Whipped Cream with a Dash of Cinnamon
Adds airiness and a subtle spice that contrasts the deep chocolate-peanut flavor. - Milk or Almond Milk
A tall glass of chilled milk is a nostalgic pairing that works especially well for kids (and the kid in all of us). - Salted Pretzels or Crackers
The salty crunch is a wonderful contrast and makes for a playful sweet-savory snack plate. - Cheesecake Bites or Mini Tarts
If you’re creating a dessert platter, the creamy tang of cheesecake offers a nice balance to the bars’ rich peanut-chocolate combo. - Mint Tea or Herbal Infusions
A hot cup of peppermint or chamomile tea helps refresh the palate after such a lush dessert.
Storage Instructions
Chocolate Peanut Butter Dream Bars store exceptionally well, making them a perfect make-ahead dessert or sweet snack to enjoy over a few days. Here’s how to keep them fresh and delicious:
Refrigeration:
- Storage Duration: Up to 5–7 days in the fridge.
- How to Store: Place bars in an airtight container, separating layers with parchment paper to prevent sticking.
- Serving Tip: Let them sit at room temperature for 5–10 minutes before serving for the best texture and flavor.
Freezing:
- Storage Duration: Freeze for up to 2 months.
- How to Freeze: Wrap individual bars tightly in plastic wrap and store in a freezer-safe container or zip-top bag.
- Thawing: Transfer to the fridge overnight or leave at room temperature for about 30 minutes before eating.
These bars maintain their structure beautifully and are just as satisfying straight from the fridge or after being thawed from frozen.
Estimated Nutrition
Please note: The following nutrition is an estimate based on standard ingredients and may vary based on specific brands or modifications.
Per Bar (assuming 16 bars per batch):
- Calories: ~320
- Total Fat: 22g
- Saturated Fat: 10g
- Carbohydrates: 28g
- Sugars: 20g
- Protein: 5g
- Fiber: 2g
- Sodium: ~140mg
These dreamy treats are indulgent and rich, so a little goes a long way. If you’re monitoring your intake, smaller portions are still deeply satisfying.
Frequently Asked Questions
1. Can I use crunchy peanut butter instead of creamy?
Yes, you can! It will add a pleasant texture to the filling, but make sure it’s not a natural-style peanut butter as those tend to separate and affect consistency.
2. Can I make this recipe gluten-free?
Absolutely. Just substitute the chocolate cookies with a gluten-free alternative. Many brands offer gluten-free sandwich cookies that work beautifully for the crust.
3. Do I have to use heavy cream for the ganache?
While heavy cream gives the best silky texture, you can substitute it with full-fat coconut milk or evaporated milk if needed. Avoid low-fat options—they may cause the chocolate to seize or split.
4. Can I prepare these bars ahead of time?
Yes! In fact, they’re even better the next day. The layers firm up and the flavors meld together. Make them up to 2 days in advance for best results.
5. How do I cut the bars cleanly?
Use a sharp knife dipped in hot water and wiped dry between each cut. This helps glide through the ganache and keep those beautiful layers intact.
6. What can I use instead of chocolate chips for the topping?
You can use a chopped chocolate bar—semi-sweet or dark chocolate works best. Just ensure it’s a high-quality brand with at least 50% cocoa solids for proper melting.
7. Can I double the recipe?
Yes, simply use a 9×13 inch pan instead of 8×8 or 9×9. Doubling all ingredients keeps the layers balanced. Just make sure to allow a bit more chill time between steps.
8. How do I store leftovers without the bars drying out?
Keep them in an airtight container in the fridge and avoid frequent exposure to air. Layering parchment between stacked bars also helps prevent sticking or smudging.
Conclusion
Chocolate Peanut Butter Dream Bars are the ultimate indulgent treat—layered, luscious, and effortless to make. Whether you’re whipping them up for a party, gifting them during the holidays, or simply satisfying a craving, they check every box for flavor, texture, and presentation. With no oven involved and just a few pantry staples, they’re a go-to dessert for any occasion. Don’t be surprised if they become a frequent request from friends and family—just be ready to share the recipe!

Chocolate Peanut Butter Dream Bars
- Total Time: 2 hours 20 minutes
- Yield: 16 bars
Description
Sink your fork into these luscious, no-bake Chocolate Peanut Butter Dream Bars—a rich, indulgent dessert that layers a chocolate cookie crust, a creamy peanut butter center, and a smooth chocolate ganache topping. Perfect as a quick dessert idea, an easy recipe for parties, or a make-ahead treat for weeknight indulgence. Whether you need a new addition to your collection of dessert food ideas or a delicious twist on peanut butter favorites, this recipe is your next go-to.
Ingredients
For the Chocolate Cookie Crust:
- 2 cups chocolate cookie crumbs (like Oreos)
- 1/2 cup unsalted butter, melted
For the Peanut Butter Filling:
- 1 cup creamy peanut butter (not natural)
- 1/2 cup unsalted butter, softened
- 1 3/4 cups powdered sugar, sifted
- 1 tsp vanilla extract
- Pinch of salt (optional)
For the Chocolate Ganache Topping:
- 1 1/2 cups semi-sweet chocolate chips
- 1/2 cup heavy cream
- 1 tbsp unsalted butter
Optional Garnishes:
- Sea salt flakes, crushed peanuts, mini peanut butter cups, or chocolate shavings
Instructions
- Line an 8×8 or 9×9 inch pan with parchment paper.
- In a food processor, blend the cookie crumbs with melted butter. Press into the bottom of the pan firmly to form the crust. Chill for 15–20 minutes.
- Beat peanut butter and softened butter together until fluffy. Gradually add powdered sugar, then mix in vanilla and salt. Spread evenly over the chilled crust. Chill again for 20–30 minutes.
- Combine chocolate chips, cream, and butter in a microwave-safe bowl. Heat in 20-second intervals, stirring until smooth. Pour over peanut butter layer and spread evenly.
- Chill for at least 2 hours. Once set, lift out using parchment, slice into squares, and serve.
- Prep Time: 20 minutes
- Chill Time: 2 hours