

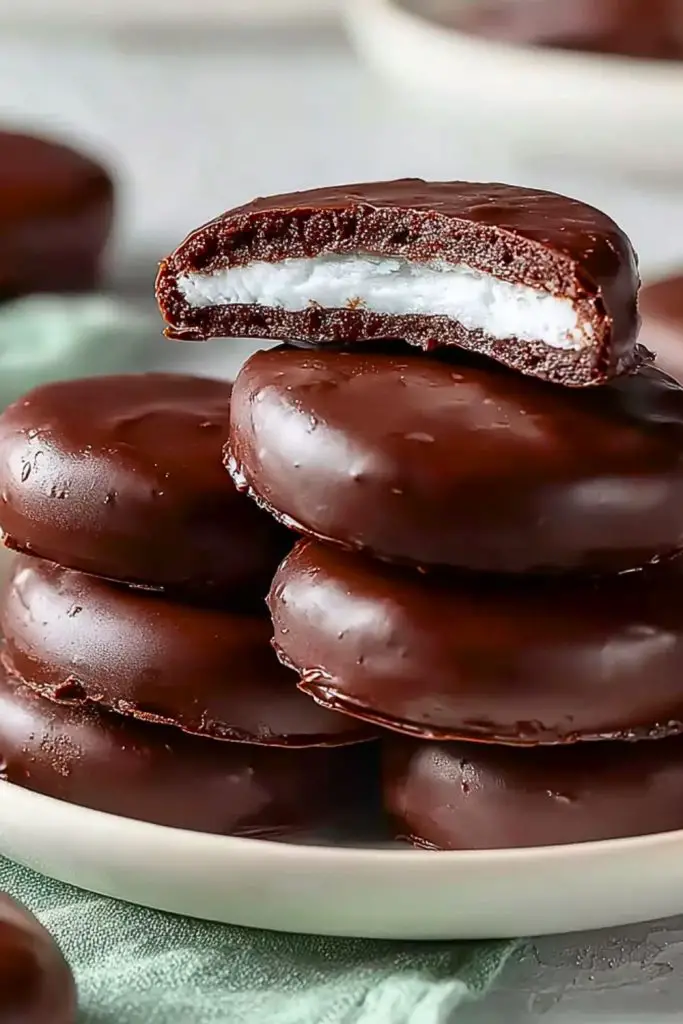
Cool, creamy, and dipped in a luscious layer of dark chocolate—Homemade Peppermint Patties are the ultimate treat for mint lovers. With their smooth peppermint filling and rich, glossy coating, these bite-sized delights strike the perfect balance between refreshing and indulgent. They’re not only visually striking but also incredibly satisfying to bite into, with a crisp snap of chocolate followed by a melt-in-your-mouth center.
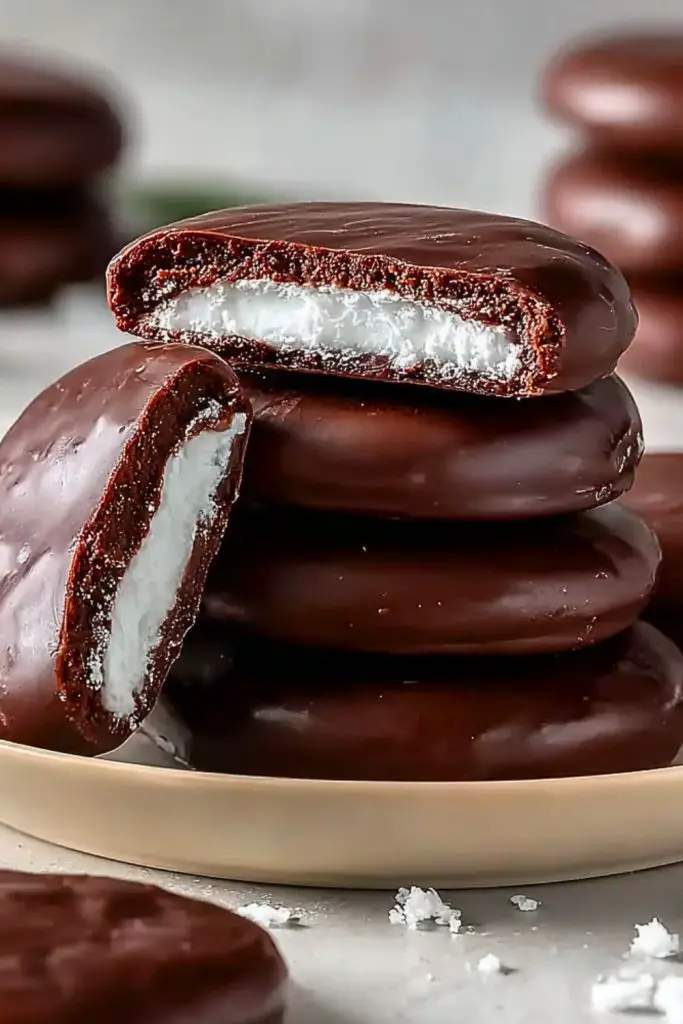
Whether you’re looking to impress holiday guests, pack a unique homemade gift, or simply recreate your favorite candy with cleaner ingredients, these peppermint patties deliver on all fronts. Unlike the store-bought version, making them at home gives you control over quality, sweetness, and even size. Once you taste how much better homemade can be, you’ll never go back.
Why You’ll Love This Homemade Peppermint Patties Recipe
These peppermint patties are a win for both flavor and fun. They’re easy to make, use minimal ingredients, and require no baking. You can also customize them with different chocolate coatings or shapes for holidays and special occasions. Plus, they’re naturally gluten-free and can be made dairy-free or vegan depending on your chocolate of choice. Perfect for gifting or keeping in the freezer for an after-dinner treat!
Preparation Phase & Tools to Use
To make homemade peppermint patties successfully, having the right tools can make a big difference:
- Mixing Bowls – For preparing your peppermint dough and melting chocolate separately.
- Electric Mixer or Stand Mixer – Helps beat the dough until smooth and firm without tiring your hands.
- Rolling Pin & Parchment Paper – Roll out your peppermint filling evenly before cutting.
- Round Cookie Cutter (1.5 to 2 inches) – Creates that iconic peppermint patty shape.
- Double Boiler or Microwave-Safe Bowl – For gently melting the chocolate to avoid burning.
- Fork or Dipping Tool – For neatly coating each patty in chocolate.
- Cooling Rack or Parchment-Lined Tray – Ideal for setting the patties after dipping without sticking.
Each tool adds precision and convenience, turning a simple recipe into a polished, candy-shop-worthy result.
Preparation Tips
Before you begin, make sure all your ingredients are at room temperature unless otherwise specified. When making the peppermint dough, it should be firm but pliable—similar to playdough. If it’s too sticky, add a bit more powdered sugar; if it’s too dry, a small splash of cream will help. Chill the filling discs before dipping in chocolate to prevent melting. When melting chocolate, always go slow and stir often to avoid overheating. A little patience and attention to detail go a long way in getting that clean, professional finish.
Ingredients for this Homemade Peppermint Patties Recipe
For the Peppermint Filling:
- 2 1/4 cups powdered sugar (plus extra for dusting)
- 1 1/2 tablespoons unsalted butter, softened (or coconut oil for dairy-free/vegan)
- 2 tablespoons heavy cream (or non-dairy milk for vegan)
- 1/2 teaspoon pure peppermint extract
- 1/2 teaspoon vanilla extract (optional, for flavor depth)
- Pinch of salt
For the Chocolate Coating:
- 10 oz semi-sweet or dark chocolate, chopped or in chips
- 1 tablespoon coconut oil or shortening (helps thin the chocolate for coating)
Optional:
- Flaky sea salt for sprinkling (for added texture and flavor contrast)
- Natural food coloring if you want to tint the filling for festive variations
Step 1: Make the Peppermint Dough
In a large mixing bowl, combine powdered sugar, softened butter, peppermint extract, vanilla extract, and a pinch of salt. Add the cream gradually and mix using an electric mixer until a thick dough forms. It should be smooth, not crumbly. If it’s too sticky, add a little more powdered sugar.
Step 2: Shape and Chill the Filling
Lightly dust your work surface with powdered sugar and roll out the peppermint dough to about 1/4-inch thickness. Use a round cookie cutter (1.5 to 2 inches wide) to cut out discs. Place the discs on a parchment-lined baking tray and refrigerate or freeze them for 20–30 minutes until firm. This step is crucial for clean chocolate dipping later.
Step 3: Melt the Chocolate
Using a double boiler or microwave (in 30-second intervals), gently melt the chocolate with coconut oil or shortening. Stir frequently until completely smooth and glossy. Let it cool for a minute or two, but not so much that it begins to harden.
Step 4: Dip the Patties
Using a fork or dipping tool, lower each chilled peppermint disc into the melted chocolate. Flip to coat both sides and tap off any excess chocolate. Carefully transfer each coated patty back onto the parchment-lined tray.
Step 5: Let Them Set
Allow the peppermint patties to set at room temperature for about 30 minutes, or refrigerate them for 10–15 minutes until the chocolate hardens. If desired, sprinkle a tiny pinch of flaky sea salt on top before they fully set for a gourmet finish.
Step 6: Serve or Store
Once the chocolate is firm, serve the peppermint patties immediately or store them in an airtight container. They can be kept at room temperature for up to a week, refrigerated for up to 2 weeks, or frozen for longer storage.
Notes
Homemade Peppermint Patties are best when the filling is creamy yet firm, and the chocolate coating has a clean, crisp snap. You can play with the strength of the peppermint extract depending on your taste—start with less and build up if needed. Adding a touch of vanilla brings warmth and balance to the sharpness of the mint. For a festive touch, you can tint the peppermint filling with natural food coloring (like red or green) or even shape them into hearts or stars with cookie cutters.
Watch Out for These Mistakes While Cooking
- Overmixing the Dough: Overworking the peppermint filling can cause it to become too soft or greasy. Mix just until everything comes together.
- Skipping the Chill Time: Dipping warm or soft discs into chocolate will lead to a mess. Always chill the filling before coating.
- Overheating Chocolate: Burnt chocolate ruins the flavor and texture. Always melt slowly, using a double boiler or low microwave heat.
- Using Too Much Peppermint Extract: It’s potent—a little goes a long way. Measure carefully.
- Not Tapping Off Excess Chocolate: Too much chocolate on each patty can cause uneven surfaces and pooling.
Storage Instructions
Store your peppermint patties in an airtight container. They keep well at room temperature for 5–7 days, or in the fridge for up to two weeks. For long-term storage, freeze them between layers of parchment in a sealed container. Let frozen patties thaw in the fridge to avoid condensation. Always keep them away from heat or humidity to prevent chocolate bloom or melting.
Estimated Nutrition (Per Serving – 1 Patty)
- Calories: ~130
- Fat: 6g
- Saturated Fat: 4g
- Carbohydrates: 19g
- Sugar: 17g
- Protein: <1g
- Fiber: 1g
- Sodium: 5mg
(Nutrition may vary depending on chocolate type and ingredient substitutions.)
Frequently Asked Questions
How long do homemade peppermint patties last?
Up to 2 weeks in the refrigerator or 2–3 months in the freezer.
Can I use milk chocolate instead of dark?
Yes, but it will result in a much sweeter patty. Dark or semi-sweet chocolate provides better balance.
Are these peppermint patties vegan?
They can be! Use coconut oil and non-dairy milk, and choose dairy-free chocolate.
Do I have to use a cookie cutter?
No, you can also shape the dough into balls and flatten them into discs with your hands.
Why is my filling too sticky?
Add a little more powdered sugar until it becomes workable.
Can I add other flavors?
Yes! A drop of almond or orange extract can give a fun twist to the classic mint.
Why is my chocolate coating uneven?
Make sure the filling is fully chilled and tap off excess chocolate after dipping.
Can kids help make these?
Definitely! It’s a fun, hands-on recipe great for family kitchen time.
Conclusion
Homemade Peppermint Patties are a timeless treat with a refreshing twist, combining rich chocolate with cool mint in every bite. They’re simple to make, perfect for gifting, and a joy to customize for holidays or personal preferences. Whether you’re making a batch for a festive occasion or just want a stash of minty indulgence on hand, this recipe is sure to become a favorite. Once you master the method, you’ll find yourself making them again and again.

Homemade Peppermint Patties
- Total Time: 45 minutes
- Yield: 20 patties
Description
Cool, refreshing, and coated in rich chocolate, these Homemade Peppermint Patties are a must-try if you’re searching for an easy recipe to satisfy your sweet tooth. Perfect for holidays, edible gifts, or just a personal treat, this no-bake dessert delivers a creamy peppermint center wrapped in a smooth chocolate shell. Ideal for anyone looking for quick dessert ideas, healthier alternatives to store-bought candies, or fun kitchen projects, this recipe is a delicious addition to your go-to food ideas. Whether you’re browsing breakfast ideas or seeking a unique healthy snack, these little bites fit right into your list of dessert or dinner ideas too!
Ingredients
2 1/4 cups powdered sugar
1 1/2 tablespoons unsalted butter, softened
2 tablespoons heavy cream
1/2 teaspoon peppermint extract
1/2 teaspoon vanilla extract (optional)
1 pinch salt
10 oz semi-sweet or dark chocolate, chopped or chips
1 tablespoon coconut oil or shortening
Flaky sea salt for garnish (optional)
Natural food coloring (optional)
Instructions
1. In a large bowl, mix powdered sugar, softened butter, peppermint extract, vanilla, salt, and heavy cream until a thick dough forms. Adjust consistency with extra sugar or cream as needed.
2. Lightly dust a surface with powdered sugar and roll out the dough to 1/4-inch thickness. Cut into discs using a 1.5 to 2-inch cookie cutter.
3. Place the discs on a parchment-lined tray and chill for 20–30 minutes until firm.
4. Melt the chocolate with coconut oil using a double boiler or microwave in short bursts, stirring until smooth.
5. Dip each chilled peppermint disc in the melted chocolate using a fork. Tap off excess and place back on parchment.
6. Let set at room temperature for 30 minutes or refrigerate for 10–15 minutes. Sprinkle with flaky salt before chocolate fully sets (optional).
7. Serve immediately or store in an airtight container.
Notes
Always chill the filling before dipping to avoid melting in the chocolate.
Use coconut oil in the chocolate for a smoother, glossier finish.
Add a small amount of peppermint at first—it’s powerful and can overwhelm quickly.
- Prep Time: 45 minutes
- Cook Time: 0 minutes
- Category: Dessert
- Method: No-Bake
- Cuisine: American
Nutrition
- Serving Size: 1 patty
- Calories: 130
- Sugar: 17g
- Sodium: 5mg
- Fat: 6g
- Saturated Fat: 4g
- Unsaturated Fat: 1g
- Trans Fat: 0g
- Carbohydrates: 19g
- Fiber: 1g
- Protein: <1g
- Cholesterol: 0mg
Keywords: homemade peppermint patties, easy dessert, chocolate mint recipe, no-bake candy, healthy snack, holiday treat